The Hidden Stress of a Running Toilet
That constant, low hissing sound from your bathroom is more than just an annoyance. It is the sound of water constantly slipping away, taking your hard-earned money along with it.
You try to ignore it, but the sound keeps you awake at night. You find yourself walking into the bathroom just to shake the handle, hoping it will stop.
It might work for a minute or two, but the trickling sound always returns. This minor issue quickly becomes a daily headache that drains your energy and makes your home feel less peaceful.
Many homeowners feel stuck when this happens. They think about calling a plumber but worry about the high cost of a simple house call.
Instead, they live with the noise, watching their water bills climb higher each month. It is a frustrating cycle that makes you feel powerless over your own home.
Why Simple Fixes Often Seem So Hard
Finding reliable advice online can sometimes feel like searching for a needle in a haystack. You want a quick answer, but instead, you run into several common obstacles:
- Overly complex manuals that make a simple rubber valve look like rocket science.
- Vague videos that skip the basic steps, leaving your bathroom floor covered in water.
- Bad advice telling you to buy expensive replacement kits when you only need a quick adjustment.
- Confusing terms that make you feel like you need a degree in plumbing just to understand your toilet tank.
- Generic tips that do not account for different types of toilets, leading to wasted time and purchased parts that do not fit.
How a Small Leak Steals Your Peace of Mind
- It creates constant worry about water damage or a sudden spike in your utility bills.
- It chip away at your confidence as a homeowner, making you feel unable to handle basic tasks.
- It causes mild embarrassment when guests visit and have to listen to your toilet running non-stop.
- It disrupts your sleep and relaxation, turning your home into a place of subtle, ongoing irritation.

Your Simple Guide to a Quiet Bathroom
You do not need expensive tools or years of training to fix this issue. Most running toilets are caused by a few small parts inside the tank that have drifted out of place or worn down over time.
By understanding how these parts work together, you can solve the problem yourself. Let us look at the first three practical steps to get your toilet working perfectly again.
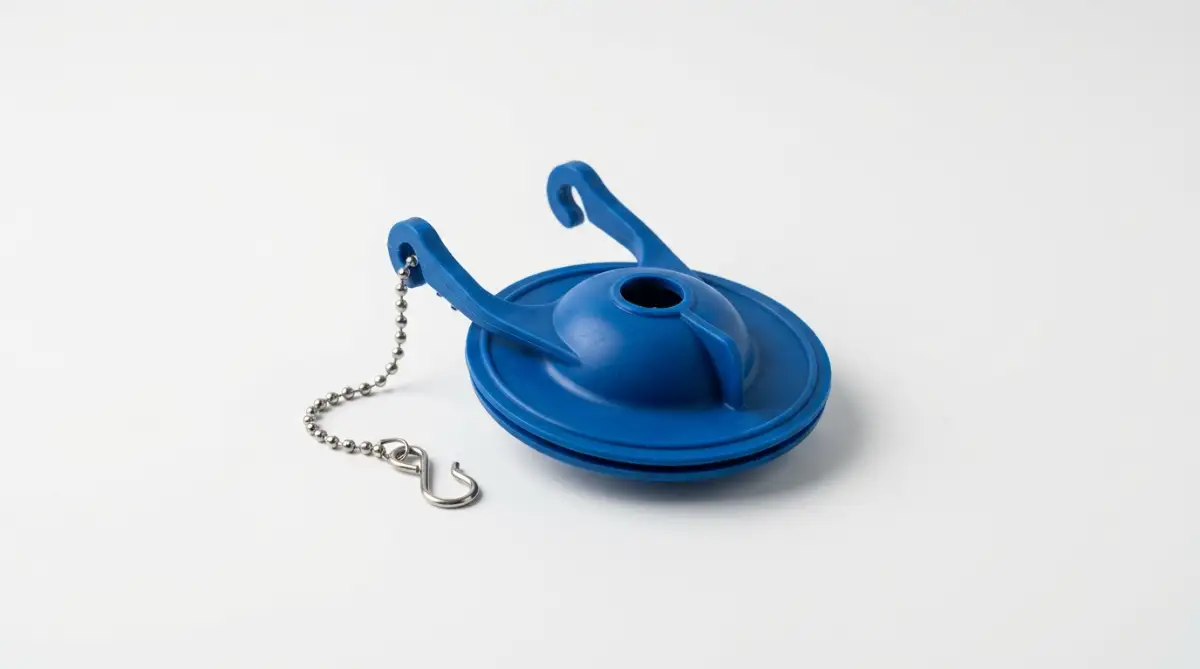
Step 1: Inspect and Clean the Flapper
The flapper is the round rubber seal at the bottom of your toilet tank. Its job is to hold water in the tank until you flush, then lift up to let water rush into the bowl.
Over time, mineral buildup and water chemicals can make the rubber stiff or dirty. When this happens, the flapper cannot make a tight seal, and water constantly leaks underneath it.
To start, turn off the water supply valve behind your toilet. Flush the toilet and hold the handle down to empty most of the water from the tank.
Now, look closely at the rubber flapper at the bottom. Reach in and run your finger along the rim of the flapper and the seat it rests on.
If you feel slime, dirt, or rough mineral deposits, you need to clean it. Wipe the underside of the flapper and the plastic drain seat with an old sponge or rag.
If the flapper feels stiff, warped, or cracked, it is time to replace it. A new flapper is very cheap and simply snaps onto the pegs of the flush valve.
Think of the flapper like the lid on a travel mug. If there is a tiny piece of dirt on the rim, your coffee will leak out when you take a sip. Cleaning the flapper restores that clean seal.
Step 2: Adjust the Flush Chain Length
The flush chain connects the toilet handle lever to the rubber flapper. When you push the handle down, it pulls the chain, which lifts the flapper.
If this chain is too short, it will keep the flapper pulled up slightly, allowing water to escape. If the chain is too long, the excess chain can slip underneath the flapper, preventing it from closing all the way.
Look at the chain while the tank is full and the toilet is silent. There should be a tiny bit of slack in the chain, about one-fourth of an inch.
If the chain is tight and lifting the flapper, move the clip up a link or two to add some slack. If the chain is wrapping under the flapper, trim the extra links or hook the clip closer to the top.
Imagine walking a dog on a leash that is too short. The dog is constantly being pulled upward and cannot rest on the ground.
By giving the chain just a little bit of breathing room, you let gravity do its job. The flapper will fall straight down and seal the tank completely.
Step 3: Set the Water Level and Float Height
Inside your tank, you will see a device called a float. It is either a floating ball on a metal rod or a floating cylinder wrapped around the fill valve.
As water fills the tank, the float rises. Once it reaches a certain height, it shuts off the fill valve.
If the float is set too high, the water level will rise above the open overflow tube in the center of the tank. This tube is there to prevent your bathroom from flooding.
If the water rises too high, it constantly pours down this tube and into the bowl, creating a endless loop. This is one of the most common causes of a running toilet.
Look at the water level inside your tank. It should sit about one inch below the top of the overflow tube.
If the water is spilling into the tube, you need to lower the float. If you have a float ball on a rod, turn the screw at the end of the rod counter-clockwise to lower it.
If you have a cylinder float, squeeze the spring clip and slide the float down the metal rod. This simple adjustment tells the valve to shut off the water sooner.
Think of it like filling a glass of water. If you keep pouring past the rim, it spills onto the counter. Lowering the float is like turning off the faucet before the glass gets full.
Why These Steps Work: The Science of Your Toilet
Your toilet relies entirely on gravity and water pressure to work. When you flush, gravity pulls the water down from the tank into the bowl.
The pressure of that rushing water clears the bowl. Once the tank is empty, gravity pulls the flapper back down to seal the drain.
The fill valve then turns on to refill the tank, pushing water back up. The float acts as a scale, measuring the weight and height of the rising water.
When the parts are out of balance, gravity cannot seal the drain, or the valve does not know when to stop. By adjusting these three parts, you restore the natural balance of gravity and pressure.
How to Double-Check Your Progress
Once you have completed these three steps, turn the water supply valve back on. Let the tank fill up completely and listen closely.
If you still hear a faint trickling sound, do not panic. There is an easy way to check if water is still leaking from the tank into the bowl.
Put a few drops of blue or red food coloring into the toilet tank. Do not flush the toilet.
Wait about ten to fifteen minutes. If you see the colored water creeping into the toilet bowl, you know you still have a leak.
If the water in the bowl remains completely clear, your seal is perfect. You have successfully stopped the leak and saved water.
Getting to Know Your Toilet Tank
To make these repairs even easier, let us look at how the inside of your tank is laid out. It might look messy at first, but it is actually a very simple system.
The fill valve is the tall tube usually located on the left side of the tank. This valve is connected to the water supply line underneath your toilet.
The flush valve is the large opening in the middle of the tank floor where the flapper sits. Attached to this is the tall overflow tube.
The trip lever is the metal or plastic bar connected to your toilet handle. It swings up when you push the handle outside.
By knowing these terms, you can talk about your toilet like an expert. You will also know exactly what to look for when you open the tank lid.
Common Tools You Might Need
You do not need a heavy toolbelt for this job. In fact, you can do almost all of these steps with your bare hands.
If you do need a tool, a simple pair of pliers or a screwdriver is usually enough. You might also want a rag or a sponge to wipe away dirt.
Keep a small towel on the bathroom floor just in case a few drops of water spill. This keeps your work area clean and safe.
Saving Money and Water
A running toilet can waste hundreds of gallons of water every single day. That is enough water to fill a small swimming pool over the course of a month.
By spending fifteen minutes on these steps, you keep that water in the pipes and money in your pocket. It is one of the easiest ways to lower your monthly utility bills.
You also help the environment by preventing unnecessary water waste. It is a win for your budget and a win for your home.
Building Your DIY Confidence
Tackling a plumbing project can feel scary at first. But once you lift the lid and see how simple the system is, that fear disappears.
You will realize that you do not need to call an expert for every small noise in your house. You have the skills to handle it yourself.
This confidence will help you take on other small home repairs around your house. You will save money, learn new skills, and feel proud of your home.
Mastering the Inner Workings of Your Toilet Tank
Now that you know the basics of checking the flapper and the chain, we can look at some advanced methods to ensure your plumbing runs quietly. Sometimes, a running toilet is caused by deeper issues that simple adjustments cannot completely resolve.
By taking a closer look at the other hidden components, you can prevent future leaks before they even begin. These advanced techniques will give you professional results without requiring a professional plumber's hourly fee.
Clearing Out Mineral Deposits from the Jet Holes
Your toilet uses a network of hidden channels to distribute water quickly during a flush. When you press the handle, water leaves the tank and rushes into the bowl through tiny holes located under the rim of the bowl.
Over time, hard water minerals like calcium and magnesium build up inside these small openings. When these jet holes become clogged, the water cannot flow into the bowl fast enough.
+--------------------------------------------------------+
|                 HOW RIM JET CLOGS AFFECT FLUSHES       |
+--------------------------------------------------------+
|                                                        |
|   [ Tank Water ]  --->  [ Mineral-Clogged Jet Holes ]   |
|                                |                       |
|                                v                       |
|                      [ Slow Water Flow ]               |
|                                |                       |
|                                v                       |
|                     [ Weak, Dragged-Out Flush ]        |
|                                |                       |
|                                v                       |
|                   [ Flapper Closes Too Late ]          |
|                                                        |
+--------------------------------------------------------+
This slow flow creates a weak flush that drags out the entire cycle, making the tank take much longer to refill. It can also cause the flapper to close too late or not seat itself properly.
To clear these mineral deposits, you only need a simple tool like a small wire coat hanger or an L-shaped Allen wrench. Gently poke the tip of the wire into each small hole under the rim of your toilet bowl.
Wiggle the wire around to break up any crusty white buildup that has gathered inside. After clearing the holes, flush the toilet once to wash away the loose debris.
This is very similar to cleaning a dirty showerhead that has started spraying water in odd directions. Once you clear those mineral pathways, the water flows with full force, and the flush cycle completes quickly and cleanly.
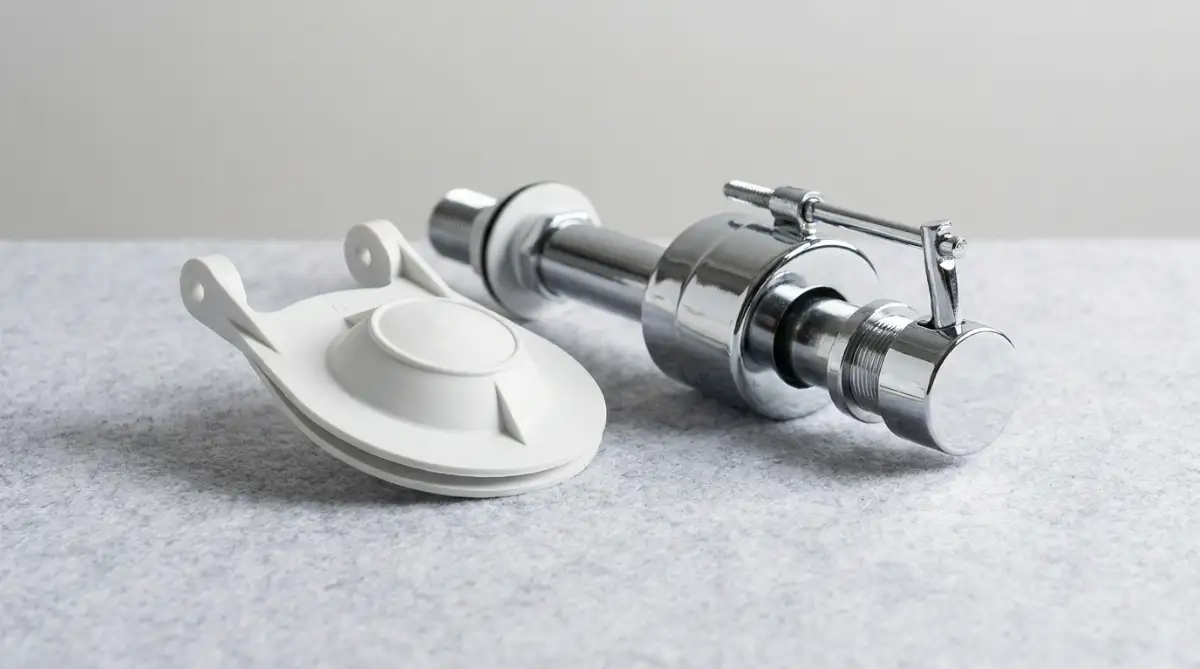
Replacing the Entire Fill Valve with Ease
If your toilet continues to run and you have adjusted the float, the internal seal of your fill valve might be worn out. Inside the top of the fill valve is a small rubber diaphragm that opens and closes to control the water flow.
When this rubber piece becomes old and brittle, it can no longer shut off the water completely, even when the float is pushed all the way up. Replacing the entire fill valve sounds like a major task, but modern replacement valves are incredibly simple to install.
First, turn off the water supply valve on the wall behind your toilet and flush the tank to empty it. Use a dry sponge to soak up the remaining puddle of water at the bottom of the tank so your floor stays dry.
Underneath the outside of the tank, locate the plastic nut that connects the water supply line to the bottom of the fill valve. Unscrew this supply line nut by hand, and then unscrew the plastic locknut that holds the valve to the tank.
Now, simply lift the old fill valve straight out of the tank and set it aside on an old towel. Slide the shank of your new fill valve down into the hole, making sure the rubber washer is placed on the inside of the tank to prevent leaks.
Hand-tighten the locknut underneath the tank, and then reconnect the water supply line. Adjust the height of the new valve by twisting the telescoping neck to match the height of your tank before turning the water back on.
A Professional Plan for Long-Term Toilet Health
Getting your toilet silent is a fantastic victory, but keeping it that way requires a little bit of ongoing care. You do not need to spend hours on maintenance, but a few quick habits will prevent major plumbing issues down the road.
By dedicating just five minutes every few months to check on your toilet, you can avoid unexpected leaks and high utility bills. Here is how you can keep your system running smoothly without any stress.
- Perform a visual inspection of the tank interior every three months to check for discoloration or loose parts.
- Gently wipe the flapper with a damp cloth twice a year to remove any slippery slime or algae buildup.
- Listen carefully to the flush cycle once a week to ensure the water stops running within sixty seconds of flushing.
- Check the water supply line behind the toilet for any dampness or signs of green corrosion on the metal fittings.
- Test the shut-off valve by turning it halfway off and back on once a year to ensure it does not freeze up from rust.
The Power of White Vinegar for Plumbing Care
Chemical drain cleaners and toilet tablets can do a lot of damage to the plastic and rubber parts inside your tank. Instead of using harsh chemicals, we recommend using ordinary white household vinegar to keep your toilet tank clean.
Vinegar is a mild, natural acid that dissolves hard water minerals without harming the rubber seals. Once a month, pour two cups of white vinegar directly into your toilet tank before you go to sleep.
Let the vinegar sit in the tank overnight to break down the scale on the walls and around the flapper seat. In the morning, simply flush the toilet once or twice to clear out the loosened minerals.
This simple step keeps the rubber flapper soft and flexible while keeping the metal parts free from rust. It is a cheap, safe, and highly effective way to extend the lifespan of your entire toilet assembly.

Common Blunders That Can Cost You Hundreds
When tackling DIY home repairs, it is very easy to make small mistakes that lead to bigger problems. Even simple systems like a toilet tank have weak points that require gentle handling.
By learning about these common pitfalls, you can protect your plumbing from accidental damage. Here are the five most frequent mistakes homeowners make when trying to fix a running toilet.
1. Using Chemical Bleach Tablets in the Tank
Many people love the convenience of drop-in chlorine tablets that keep the toilet bowl clean and blue. However, these concentrated chemical tablets are incredibly destructive to the rubber and plastic parts inside the tank.
The strong chemicals constantly eat away at your rubber flapper, causing it to rot, warp, and leak within a few months. It is always best to use bowl cleaners that clip onto the rim of the bowl rather than dropping chemicals inside the tank.
2. Over-Tightening the Plastic Connections
Modern toilet parts are made of plastic, which can crack easily if you use too much force. When installing a new fill valve or water supply line, you only need to tighten the nuts until they are snug by hand.
Using heavy metal wrenches to tighten plastic nuts often strips the threads or cracks the plastic fittings. A cracked fitting can slowly leak water onto your bathroom floor, leading to expensive wood rot and mold.
3. Choosing the Wrong Flapper Size
Not all toilet flappers are created equal, and buying a generic "one-size-fits-all" flapper can lead to frustration [1]. Toilet drains typically come in two standard sizes: two-inch and three-inch openings.
If you install a two-inch flapper on a three-inch drain, water will constantly leak through the gaps. Always measure the diameter of your drain opening or take your old flapper with you to the hardware store to find an exact match.
4. Neglecting the Water Supply Valve
Before you start working inside the tank, you must turn off the water supply valve on the wall. If this valve has not been touched in years, turning it quickly can cause the old internal packing seal to rupture and leak [2].
Always turn the valve gently and watch it closely for any drips of water around the stem. If the valve feels completely stuck, do not force it; instead, use the main water shut-off valve for your entire house to stay safe.
5. Leaving Too Much Slack in the Flush Chain
If your flush chain is too long, the extra metal links will drape across the bottom of the tank. During a flush, these loose links can easily slide underneath the rubber flapper as it closes.
This prevents the flapper from forming a tight seal, causing the toilet to run continuously until you jiggle the handle. Keep the chain adjusted with just a tiny bit of slack so it cannot get caught under the seal.
The Real Cost of Ignoring These Pitfalls
If you do not avoid these common mistakes, a minor running toilet can turn into an expensive household disaster. A cracked tank or a ruptured supply line can leak thousands of gallons of water into your home in just a few hours.
This water can quickly seep through your bathroom floor, ruining your drywall, ceiling, and subfloor below. The cost of drying out water damage and replacing ruined floors is often ten times higher than the cost of a simple DIY repair.
By taking your time and avoiding these simple mistakes, you keep your home safe, dry, and in excellent condition.
Your Path to a Silent and Efficient Home
You now possess the essential knowledge needed to stop a running toilet quickly and confidently. You do not need to feel intimidated by the tubes, chains, and valves inside your toilet tank anymore.
By following these simple steps, you can take control of your home's plumbing and stop wasting water and money. It is a wonderful feeling to walk into your bathroom and hear absolutely nothing but silence.
Do not let a small leak steal your peace of mind or drain your wallet any longer. Take fifteen minutes today to open your toilet tank, inspect the parts, and make the simple adjustments we discussed.
Your home will be quieter, your water bills will be lower, and you will have the pride of knowing you fixed it yourself.