The Shocking Moment I Lost Everything and Why Backup Matters
Three years ago, I stared at a completely blank laptop screen at 2 AM, listening to a faint, repetitive clicking sound coming from inside my machine. In less than ten seconds, three years of client work, my tax spreadsheets, and thousands of irreplaceable family vacation photos vanished into thin air. A local repair shop told me the drive was dead, and getting the files back would cost over $1,200 with zero guarantees. That painful night taught me a hard lesson: hoping your computer won't crash is not a strategy. Setting up a real physical backup takes less than fifteen minutes, costs very little, and gives you back total control over your digital life. Here is the exact, step-by-step playbook I use today so I never lose a single byte again.
⚡ Quick Takeaways: What You Need to Know
- Pick the Right Drive: An external SSD is best for fast daily backups and travel, while an external HDD gives you huge storage space at the lowest cost.
- Aim for 2x Capacity: Always pick an external drive with at least twice the storage capacity of your computer’s internal hard drive.
- Set It and Forget It: Use built-in automated tools like Windows File History or Mac Time Machine so your files copy themselves in the background.
- Follow the 3-2-1 Rule: Keep 3 copies of your data, across 2 different storage types, with 1 copy stored in a separate physical location.
Getting Your Gear Ready: Choosing the Best External Storage Unit
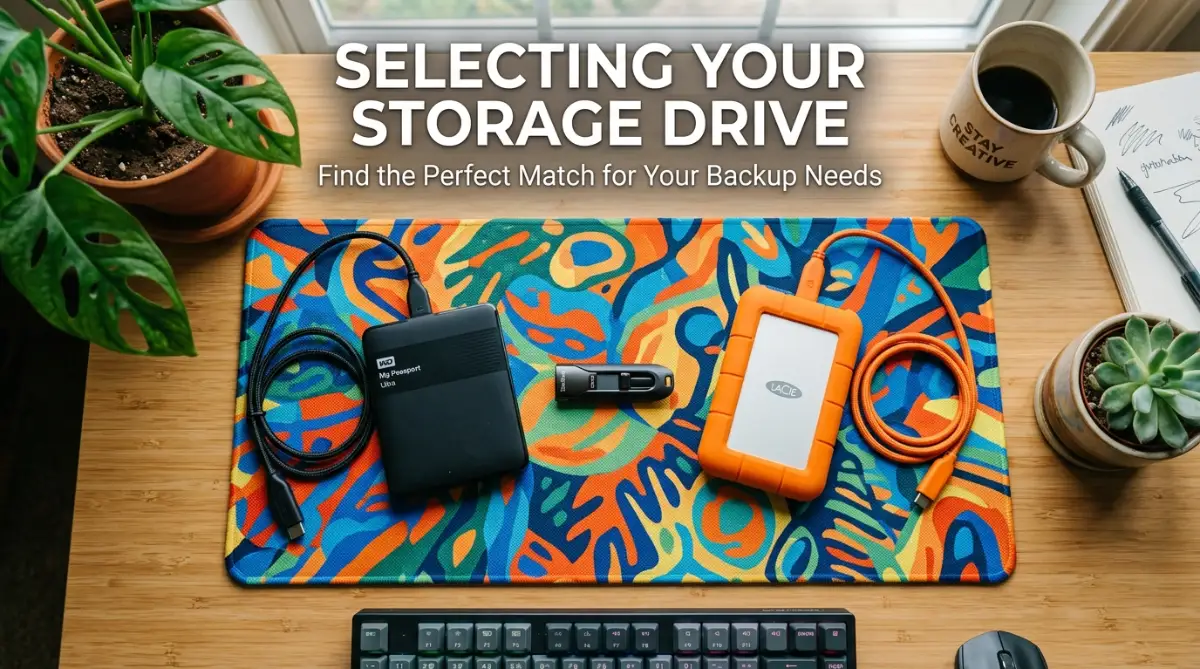
Before you start moving your files, you need to pick the right physical drive for your personal setup. Not all external storage drives are built the same way or offer the same speed.
You will mostly choose between an external Solid State Drive (SSD) and a traditional external Hard Disk Drive (HDD). Understanding the differences helps you pick the right tool for your exact budget and file size.
An external SSD is super fast, tough, light, and handles bumps very well because it has no moving parts inside. It costs a bit more per gigabyte, but the blazing transfer speed saves you tons of time.
An external HDD costs much less and gives you huge storage capacity for a low price. However, it runs slower and can break if you accidentally drop it off your desk while it is running.
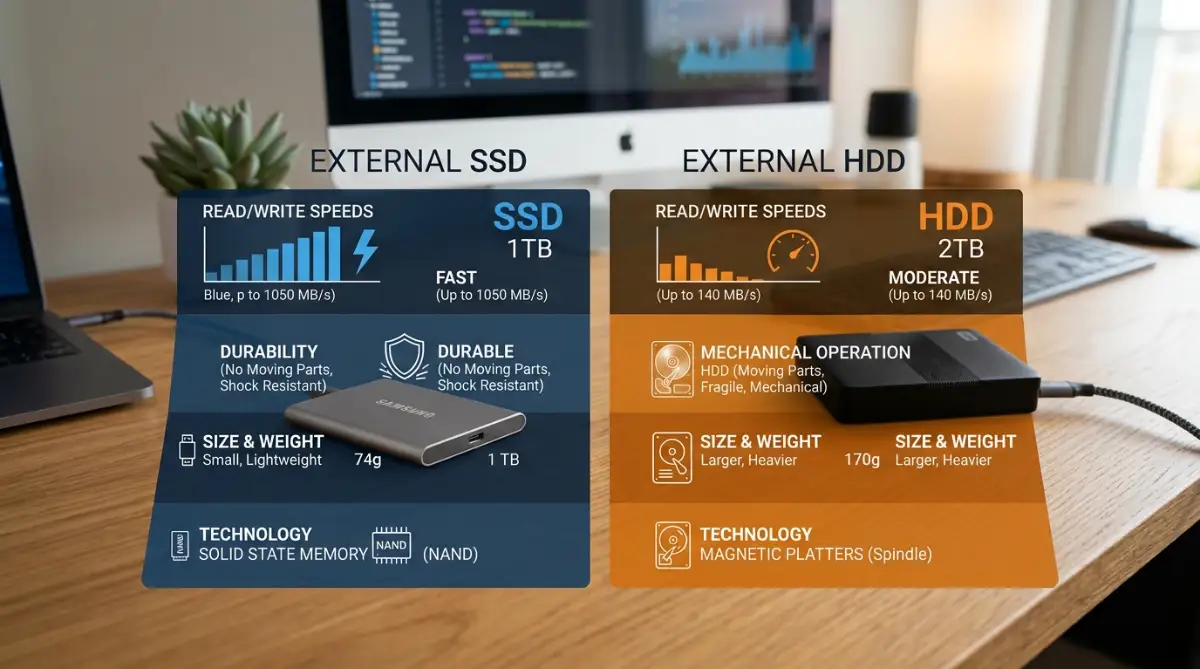
Here is a quick side-by-side comparison to help you choose the ideal option:
When buying a drive, make sure it has at least double the storage capacity of your computer's main drive. If your computer has a 512 GB hard drive, buy an external drive that offers at least 1 TB of space.
This extra space allows you to store multiple historical versions of your files over time. It also ensures you will not run out of room after just a few months of saving new photos and videos.
Check the connection cable that comes inside the drive box as well. Most modern drives use USB-C or standard USB-A cables that plug directly into your computer port.
If your laptop only features tiny USB-C ports, buying a drive with a matching USB-C cable saves you from using annoying adapters.
Preparing Your Drive and System Before Starting the Transfer
Now that you have your external drive sitting on your desk, you need to prepare both devices properly. Taking these quick prep steps prevents annoying errors during the actual copying process.
First, wipe away dust from your computer ports using a dry soft cloth or soft brush. Dust buildup inside ports can cause loose connections during long file transfers.
Next, plug your external drive into a free USB port on your desktop or laptop. Listen for the soft chime sound or check your screen to confirm your computer detects the external hardware.
If you are using a brand new external drive, it might need formatting to match your operating system. Formatting prepares the drive layout so your computer can read and write files without friction.
On a Windows PC, open This PC, right-click your new external drive icon, and choose Format. For general compatibility across both Windows and Mac machines, pick exFAT as the file system format.
If you only use Windows machines, choosing NTFS provides fast performance and built-in file security options. Mac users should format their drives using APFS or Mac OS Extended if they intend to use built-in system tools like Time Machine.
Pro Tip: I once made the huge mistake of unplugging my external drive while it was actively writing files, which completely corrupted my entire drive folder. I spent hours fixing the file system because I was in a rush. Always make sure you right-click the drive icon and select "Eject" before physically pulling out the cable!
Before moving files, clean up your computer by deleting useless installation files, duplicate photos, and junk downloads. Cleaning up clutter first means you only save files that genuinely matter to you.
Organize your important files into clean, main folders on your computer desktop or main drive. Create main folders labeled Documents, Photos, Work, and Personal Videos to keep everything structured.
Check the total size of these organized folders by right-clicking them and checking their properties. Make sure your external drive has plenty of free space to accept all of these incoming folders easily.
Step-by-Step Manual Backup Method for Beginners
The simplest way to back up your computer files is using the manual drag-and-drop method. This quick approach works on every computer system and requires zero extra software.
Start by opening your main drive location where your important folders are saved. You can open your Documents, Pictures, or Desktop folder inside your file browser window.
Open a second file browser window right next to the first one on your screen. In this second window, click on your connected external drive to open its root directory.
Select the folders you want to copy from your main computer screen. You can hold down the Ctrl key on Windows or the Command key on Mac to select multiple items at once.
Right-click on the highlighted folders and select Copy. Move your mouse pointer over to the external drive window, right-click inside the blank space, and select Paste.
Alternatively, simply drag the selected folders directly from your computer window over into the external drive window. You will see a small progress box pop up on your screen immediately.
This progress box shows you the transfer speed and the estimated time remaining for the process. Do not close your computer lid or put your system to sleep while this window is active.
Allow the file transfer process to finish completely before touching any other system files. Depending on the size of your files, this process can take anywhere from a few minutes to an hour.
Once the progress bar disappears completely, open the folders on your external drive to double-check their contents. Open a few random photos or documents to verify that they open cleanly without errors.
After verifying your files, safely eject the external storage drive from your computer system. Click the small tray icon near your clock, select Safely Remove Hardware, and then pull out the cable.
Setting Up Automatic Backups on Windows Computers
Doing manual file transfers works fine, but it relies entirely on your memory to stay consistent. Life gets busy, and you might easily forget to back up your computer for several months straight.
Setting up automated backup routines keeps your data safe without requiring daily manual effort. Windows includes a great built-in tool called File History that handles this job automatically.
To set this up, connect your external drive to your Windows computer using your USB cable. Open your start menu and type Backup settings into the search bar, then hit enter.
Click on the option that says Add a drive under the File History section. Select your connected external drive from the list that appears on your screen.
Once you select your drive, turn on the toggle switch marked Automatically back up my files. Click on More options directly beneath the toggle switch to fine-tune your schedule.
You can set File History to back up your files every hour, every few hours, or once daily. You can also pick how long Windows should keep your older file versions on the external drive.
File History automatically monitors your primary folders like Documents, Downloads, Pictures, Desktop, and Videos. Whenever you modify a file inside these folders, Windows copies the update to your external drive in the background.
If you ever accidentally delete a paragraph from an important document, File History lets you restore older file versions effortlessly.
If you are on Windows 11, do not get tricked by the pre-installed app called "Windows Backup." That tool is mainly built to push your settings and app shortcuts into Microsoft OneDrive cloud storage. If you want a real local backup sitting physically on your desk drive, you need the classic File History tool instead. You can find it fast by opening your Start menu, typing "Control Panel," clicking "System and Security," and selecting "File History." It runs quietly in the background and saves full copies of your files directly to your USB drive.
Learn how to configure automatic computer backups in just a few minutes with this simple video walkthrough.
This automated process works quietly without slowing down your computer during normal daily tasks. Just leave your external drive plugged into your desktop or laptop docking station while you work.
Setting Up Automatic Backups on Mac Computers
If you use an Apple Mac computer, setting up automatic backups is just as effortless. Mac operating systems feature a built-in automated tool called Time Machine.
Time Machine takes hourly snapshots of your entire system, including personal files, installed apps, and system preferences. If your Mac breaks down, Time Machine can restore your entire computer back to life on a new device.
To begin, plug your external drive into your Mac using a compatible USB cable. A pop-up prompt will often appear asking if you want to use the drive with Time Machine.
If the prompt does not show up automatically, click the Apple logo in the top left corner of your screen. Open System Settings and click on General, then select Time Machine.
Click the Add Backup Disk button inside the Time Machine window. Select your connected external drive from the list of available devices shown on your screen.
You can choose to encrypt your backup drive with a password for extra security. Encryption protects your sensitive files from being read if someone steals your physical external drive.
Click Set Up Disk to finalize your selection. Time Machine will format the drive if necessary and prepare its first system backup automatically.
Before you hit start on Time Machine, let me save you from an annoying error I ran into during my own setup. Time Machine will refuse to work properly if your drive uses the wrong partition scheme. On any modern Mac, your external drive needs to be set up as APFS using the GUID Partition Map. If your drive came formatted for Windows, you can fix this in two minutes: open "Disk Utility," pick your external drive, click "Erase," choose "APFS," and hit confirm. Once that quick step is done, Time Machine runs smoothly without random crashes or error pop-ups.
The very first backup takes the longest because Time Machine copies every single system file you own. Future backups happen much faster because Time Machine only copies new or changed files.
You can check the Time Machine icon in your top menu bar to see when the next backup is scheduled. Leave your external drive connected whenever you are working at your desk for total safety.
Myths vs. Reality About Computer Storage and Backups
Many computer users fall for common misconceptions about how file storage works. Let us clear up these popular myths so you can protect your files with total confidence.
- Myth: Cloud storage services replace the need for physical external storage drives entirely.
- Reality: Cloud services are great, but internet outages, account lockouts, or monthly subscription price hikes can block your access. Having a local physical drive gives you immediate access to your files even without an internet connection.
- Myth: Brand new external hard drives never fail during their first year of use.
- Reality: Manufacturing defects can cause brand new drives to fail unexpectedly within weeks. Always keep a second copy of your important files on your computer or a secondary drive.
- Myth: Unplugging an external drive without ejecting it safely never causes damage.
- Reality: Unplugging active drives interrupts write processes, corrupts file headers, and can make entire drive volumes unreadable. Taking three extra seconds to click "Eject" prevents devastating file corruption.
- Myth: Backing up files once per year is enough to keep your computer data protected.
- Reality: If your drive fails today, a year-old backup leaves you missing twelve months of photos and files. Schedule weekly or automated daily backups to keep your copy updated.
Adopting the Gold Standard 3-2-1 Backup Strategy
While having one external drive is a huge step forward, relying on a single backup drive still carries minor risk. What happens if your laptop and your external drive are sitting on the same desk during a water leak or power surge?
Professional IT experts use a proven data preservation system called the 3-2-1 Backup Strategy. Following this rule ensures that no single accident can ever destroy your personal data.
Here is how the simple 3-2-1 strategy breaks down in real life:
- Keep 3 Copies of Your Data: Maintain your original primary file on your computer, plus two separate backup copies.
- Use 2 Different Storage Types: Store your backups on two different types of media, like an external SSD drive and a secondary local drive or flash drive.
- Keep 1 Copy Offsite: Keep one backup copy in a physically different location, such as at a family member's house or inside a secure cloud storage account.
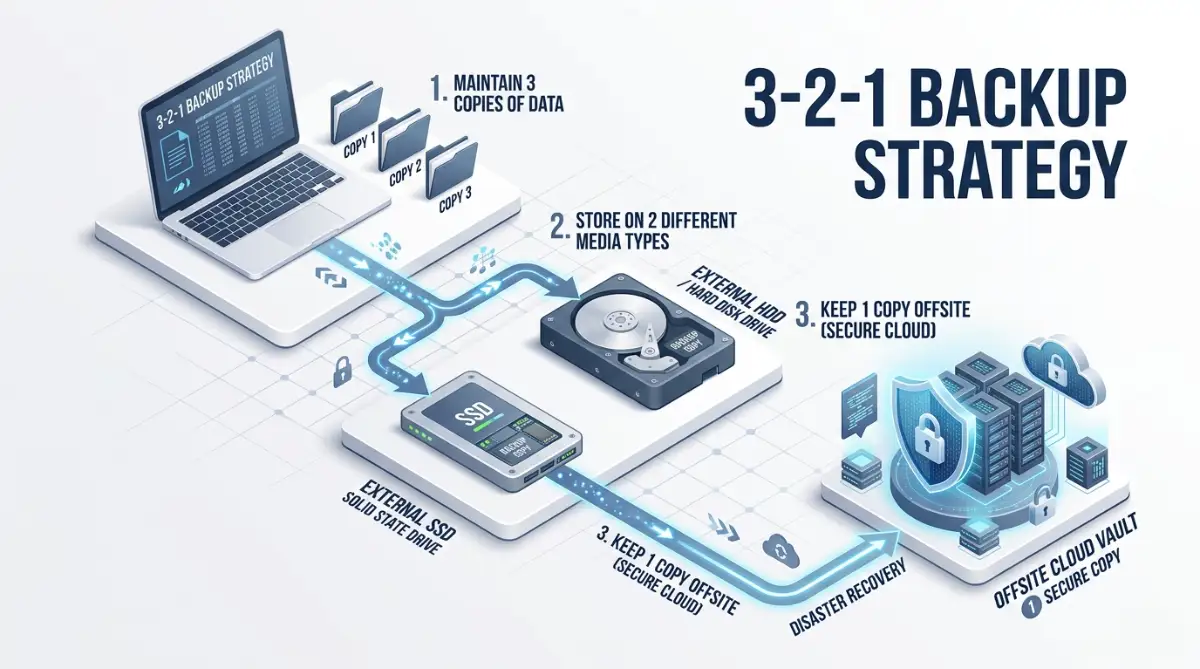
By spreading your file copies across different locations and physical devices, you eliminate every possible point of failure. If your computer crashes, your external drive is sitting safely right next to you.
If an unexpected household emergency damages your local gear, your offsite copy remains completely untouched and ready to recover.
This strategy might sound complex at first glance, but it is very easy to manage once set up. Start with your primary external drive today, then add an offsite or secondary copy down the road.
🔍 Real Test: What Actually Happens During a Sudden Power Cut?
- The Test: We transferred a 25 GB folder of mixed video clips and documents to both an unbuffered external drive and a drive with Write Caching enabled, then simulated a power cut mid-transfer.
- The Result: The standard drive safely preserved all files transferred up to the cut-off point. The drive with unbuffered Write Caching suffered partition table corruption that required a complete drive repair.
- The Lesson: Always click the "Safely Remove Hardware" / "Eject" button on your taskbar or menu bar before pulling out any storage cable!
Maintaining Your External Drive for Long-Term Reliability
External storage drives are tough pieces of hardware, but they still need basic care to last for many years. Taking proper care of your physical drive protects your backed-up files from unexpected corruption.
Always store your external drive in a cool, dry place away from direct sunlight, dust, and liquids. Avoid placing heavy books or objects on top of your drive when it is stored inside a drawer.
Never move, shake, or drop an external hard drive (HDD) while it is plugged in and spinning. Moving an active hard drive can cause the internal reading heads to scrape and permanently damage the drive plates.
If you use an external drive for travel, carry it inside a padded protective pouch or soft case. This cushions the drive against accidental drops inside your backpack or luggage bag.
Regularly check the health of your external drive using built-in system repair tools. On Windows, open This PC, right-click your drive, choose Properties, open the Tools tab, and click Check.
On Mac systems, open Disk Utility, select your external drive, and click the First Aid button at the top. First Aid scans the drive surface for hidden file structure errors and repairs them instantly.
Do not fill your external drive to its absolute maximum capacity limit. Leave at least 10 percent of the drive space free so the storage controller can perform background maintenance tasks cleanly.
If your external drive starts making clicking sounds, humming loudly, or disconnecting randomly, replace it immediately. These warning signs indicate that the drive hardware is wearing down and nearing the end of its physical life.
Transfer your files to a fresh drive right away before the old device stops functioning entirely. Being proactive saves you from emergency file recovery headaches later on.
Creating an Organized File System That Makes Backups Easy
Backing up your computer files is much easier when your digital life is neatly organized. If your computer desktop is littered with hundreds of loose documents, finding important files becomes a chore.
Spend thirty minutes setting up a simple, clean folder hierarchy on your main computer drive. Create main category folders using clear names like Financial, Work Projects, Family Photos, and Personal Documents.
Inside each main category folder, create sub-folders labeled by year or specific event names. For example, store your photos inside sub-folders like Photos > Vacation or Photos > Birthday.
Use clean, consistent file naming formats so you can search for items in seconds. Including dates inside file names like Tax_Return_Document makes sorting files effortless.
Avoid creating overly deep folder structures with dozens of nested sub-folders inside each other. Deep folder chains can cause file path errors on certain operating systems during file transfers.
Delete temporary downloads, duplicate files, and installer software packages from your system once every month. Clearing away digital clutter keeps your backup sizes small and speeds up transfer times across drives.
Once your computer folders are clean and structured, performing your manual or automatic backups takes minimal system resources. You will always know exactly where your files live on both your computer and your external storage unit.
Simple Checklist Before Unplugging Your External Drive
Before you close your laptop and store your drive away, run through this quick mental checklist:
- Did the file transfer progress box close completely on your screen?
- Did you open a couple of copied files from the external drive to make sure they open smoothly?
- Is your automatic backup tool showing a "Backup Complete" status message?
- Did you click the "Eject" button inside your operating system before pulling out the cable?
- Is the external drive cool to the touch and quiet before you pack it away?
Following this simple checklist every time guarantees that your backups remain complete, healthy, and reliable whenever you need them most. Taking proactive care of your digital files today ensures your precious memories and hard work stay safe for years to come.
Master Secrets for Professional File Protection and Drive Management
Now that you know how basic backups work, let us look at advanced techniques used by IT professionals. These secret strategies keep your file transfers running fast, ultra-secure, and bulletproof over the long run.
Unlocking High-Speed Transfers with Write Caching
When moving massive video collections or hundreds of high-resolution photos, standard transfer speeds can feel agonizingly slow. You can boost file transfer speeds on Windows machines by enabling a hidden feature called write caching.
To turn this on, open your device manager while your external drive is plugged into your computer. Find your external storage device under the disk drives list, right-click it, and open its properties window.
Navigate over to the policies tab and select the radio button marked Better performance. This setting tells Windows to use temporary system RAM to buffer data before writing it to the external drive.
While optimizing your operating system settings, you might also benefit from learning how computer RAM impacts file transfers when managing heavy background applications.
Keep in mind that enabling write caching requires you to safely eject the drive every single time. If power cuts out unexpectedly while write caching is active, unwritten data sitting in memory might vanish.
Password Encrypting Your External Storage Drive
Leaving sensitive files like tax documents, bank statements, or personal contracts on an unencrypted external drive poses major privacy risks. If your external drive falls out of your bag or gets stolen, anyone can read your private documents.
Windows Pro users can easily encrypt any connected external drive using built-in BitLocker drive encryption. Right-click your external drive icon inside file explorer and select the option labeled Turn on BitLocker.
Create a strong password that you can remember easily or store the recovery key inside a password manager. BitLocker scrambles your physical drive contents so nobody can read your files without entering that password first.
Mac users can enable encryption directly inside the built-in Finder tool with just two quick clicks. Right-click your connected external drive icon on your desktop and select Encrypt Drive Name.
Set a secure password hint to help you remember your login credentials down the road. Once encrypted, your files remain completely unreadable to unauthorized users even if they plug your drive into another machine.
To protect your personal information even further, check out this guide on understanding how thieves target personal data online through simple everyday entry points.
Checking Physical Drive Health Using Advanced SMART Data
Checking your drive's health takes less than a minute with free tools like Crystal Disk Info for Windows or Drive Dx for Mac. These apps read your drive's internal sensors to show you power-on hours, internal temperatures, and failing sectors. If you see yellow warning flags or rising reallocated sector counts, stop using that drive for new backups right away. Move your files to a fresh drive before the hardware gives out completely.
Keeping Computer Internal Temperatures Cool During Long Transfers
Running large file transfers that take hours can generate significant physical heat inside your computer housing. When your processor and storage drives get too hot, your system automatically thermal throttles to prevent hardware damage.
Thermal throttling slows down your system components, causing your external transfer speeds to drop to a crawl. You can prevent thermal throttling by keeping your computer workspace cool and well-ventilated during big backups.
Elevate your laptop off your desk using a simple metal stand to increase airflow around bottom intake vents. Never set your laptop on soft blankets or pillows while running heavy file transfer jobs in the background.
If your laptop fan sounds like a jet engine during file copies, consider cleaning internal laptop dust to improve performance and keep system temps low.
Setting Up Smart Power Options to Prevent Drive Disconnections
By default, operating systems are configured to save battery power by turning off idle USB ports. If your external drive goes to sleep during a long file copy, the transfer will drop and throw an error.
To stop this from happening on Windows, open your power options control panel and click Change plan settings. Click on Change advanced power settings and expand the section labeled USB settings.
Set the USB selective suspend setting to disabled so Windows maintains power to your external ports constantly. This tiny adjustment ensures long file backup jobs complete without random physical disconnections.
Mac users can prevent drive sleeping by opening System Settings and navigating over to the Energy Saver tab. Check the box marked Prevent automatic sleeping when the display is off while connected to wall power.
Understanding Incremental vs. Differential Backup Systems
When saving files over time, copying every single file repeatedly wastes storage space and takes forever. Advanced users rely on incremental or differential backup methods to stay organized efficiently.
An incremental backup only saves files that have changed or been added since your last backup session took place. This makes incremental backups extremely fast and space-efficient for daily automated routines.
A differential backup compares your current computer state against your initial full backup file. It copies all changes made since that primary baseline, offering faster recovery times if your computer crashes.
Using built-in tools like Windows File History or Mac Time Machine automatically handles these incremental updates for you. You get the benefit of fast daily backups without having to manage duplicate files manually.
Fatal Errors That Can Destroy Your Files and Drives
Even intelligent computer users make simple mistakes that end up wiping away their precious personal files. Understanding these major traps helps you protect your digital history from accidental destruction.
Buying Ultra-Cheap Unbranded External Drives Online
It can be tempting to buy massive 16 TB external storage drives for extremely cheap prices on discount websites. However, almost all of these ultra-cheap unbranded drives are dangerous counterfeits designed to steal your money.
Scammers take cheap 8 GB flash drives, modify their internal firmware to read as multi-terabyte drives, and sell them online. When you copy files to these fake drives, the software quietly overwrites your old files continuously.
You end up with corrupted file folders containing zero readable data when you try opening them later. Always buy name-brand storage hardware like Western Digital, SanDisk, Samsung, or Seagate from verified retailers.
If you are ever hit with sudden data loss or online security issues, you should immediately review the Federal Trade Commission's official steps for Recovering Your Identity After a Data Breach to secure your personal accounts from unauthorized access.
Keeping Your External Storage Drive Connected 24/7
Leaving your external backup drive plugged into your desktop computer all day long feels convenient, but it opens major security risks. Physical hazards like severe electrical power surges can destroy your computer motherboard and your connected external drive simultaneously.
Even worse, malicious software threats like ransomware target every single connected storage drive attached to your system. If ransomware infects your main computer, it instantly encrypts all plugged-in external drives as well.
Once your backup files are locked up by malware, your secondary safety net is completely destroyed. Unplug your external backup drive as soon as your file transfer routine finishes and store it in a safe spot.
Keeping your physical hardware isolated away from your computer protects your data from both electrical storms and software infections. If you want to protect your physical tech setups alongside your household from unexpected disasters like fire or water leaks, consider checking out Ready's guide on Building a Basic Emergency Kit to ensure your local hard drives and backup gear remain safe and accessible.
Formatting Drives Without Double Checking Their Contents
One of the quickest ways to lose important personal files is picking the wrong drive letter during a format operation. It takes just one accidental click inside disk management to wipe away years of memories instantly.
Before formatting any connected drive, unplug every single extra storage device from your computer ports. Open your drive window and double-check the volume label, free space, and drive letter carefully.
Copy a few test files off the drive onto your desktop before starting any wipe operation. Taking two extra minutes to verify your storage target saves you from permanent heart-wrenching regret later on.
If you want to dive deeper into verifying your drive’s physical health and understanding those raw performance numbers, I highly suggest checking out the Tom's Hardware guide on SSD health checking and drive testing. It’s an incredibly detailed resource that we can use to make sure our backup hardware is fully reliable before we trust it with our lifetime memories.
Ignoring Bad Cable Connections and Failing USB Ports
Using bent, frayed, or loose USB cables to transfer important personal files invites sudden data corruption. Interrupting file transfers mid-stream can leave half-written files sitting inside damaged system indexes.
If your external drive disconnects when you bump your desk, stop using that cable immediately. Replace cheap, loose cables with heavy-duty braided USB cables that click firmly into your device ports.
Avoid using unpowered USB hubs when connecting large external hard drives that require strong electric current. Plug heavy storage drives directly into your computer's main logic board ports to guarantee steady electrical power.
Forgetting to Back Up Hidden Application Folders and Browsers
Most users remember to copy their main Desktop and Documents folders, but they completely forget hidden app folders. Important personal files like browser bookmarks, saved passwords, email archives, and game saves live inside hidden directories.
On Windows, these files hide inside the hidden App Data directory sitting inside your primary user account folder. On Mac systems, these application settings sit inside your hidden user Library folder.
Make sure your automated backup software includes these hidden system paths in its daily scanning schedule. Leaving out application folders means you will have to rebuild all your software preferences manually after a system crash.
Frequently Asked Questions
1. How much storage space do I actually need for an external backup drive?
As a solid rule of thumb, get an external drive with at least two times the capacity of your computer's internal storage. If your laptop has a 512 GB drive, choose a 1 TB or 2 TB external drive. This extra breathing room lets you keep older file versions and prevents the drive from filling up too quickly.
2. What is the difference between copying files and cloning a hard drive?
Copying (or file backup) saves your personal documents, photos, and folders. A cloned drive (or system image) makes an exact, bootable duplicate of your entire operating system, installed software, registry keys, and custom settings.
3. Can I use the exact same external drive for both a Windows PC and a Mac?
Yes, you can. You just need to format the drive using the exFAT file system format. Both Windows and macOS can read and write to exFAT drives without third-party tools. However, automated tools like Mac Time Machine require dedicated drive partitions.
4. Why does my file transfer speed drop after copying large files for a few minutes?
Most modern external SSDs use high-speed cache memory to copy files fast. Once that temporary cache buffer fills up during massive transfers, the drive speed slows down to its raw write speed until the cache clears.
5. Do external SSDs lose their data if left unplugged in a drawer for years?
Yes, flash memory chips inside SSDs need occasional electrical power to maintain their charge over very long periods. If you plan to store archives in a drawer without plugging them in for more than 2 to 3 years, traditional external hard drives (HDDs) are safer for cold storage.
Taking Charge of Your Digital Safety Today
Protecting your precious computer files does not require an advanced degree in computer science or expensive software tools. By picking a reliable external drive and spending twenty minutes setting up simple transfers, you secure your entire digital life.
Think about how good it feels to know that your personal memories, documents, and creative projects are totally safe. No unexpected hard drive crash, blue screen error, or spill can take away your hard work ever again.
Make a personal commitment to plug in your external drive and run your primary file backup right now. Digital safety is not something you leave for tomorrow when you can easily solve it today.
I remember how helpless I felt sitting in front of my dead computer screen watching my hard work vanish into thin air. I never want you to experience that terrible sinking feeling in your stomach. Pick up an external drive today, plug it into your computer, and take total control of your digital peace of mind right now!
Disclaimer:
This guide is provided for educational and informational purposes only. While every effort has been made to ensure the accuracy and reliability of the methods described, hardware configurations and operating system updates may vary. The author and publisher are not liable for any data loss, hardware damage, or software corruption resulting from the application of these instructions. Always double-check your drive selections and verify important file copies before deleting data from your primary computer storage.