The Eye-Sore on Your Wall That You Cannot Ignore
It starts with a simple mistake. A door swings open too fast, a piece of furniture bumps the wall, or a kid plays too rough indoors. Suddenly, you are staring at an ugly, jagged hole in your beautiful drywall.
Every single time you walk into the room, your eyes dart straight to that damaged spot. It acts like a magnet for your attention, slowly draining the joy out of your living space. You might try to hide it by hanging a picture frame or moving a chair in front of it.
Deep down, you know the hole is still there, waiting to be fixed. It makes your whole home feel a bit run-down and neglected, even if the rest of the room is perfectly clean. You want to fix it, but the fear of making it look worse keeps you from trying.
Why Traditional DIY Quick Fixes Often Fall Short
Many homeowners try to solve this issue quickly, but they often end up with terrible results. This usually happens because of bad advice found online or rushing through the process.
Here are the main reasons why DIY wall repairs often fail:
- Using the wrong materials: People often buy cheap, lightweight spackle for large holes, which shrinks and cracks over time.
- Skipping the cleaning step: Applying patch kits over loose plaster and dust prevents the adhesive from sticking properly.
- Over-applying joint compound: Putting on a single, thick layer of mud instead of multiple thin coats leads to sagging and uneven surfaces.
- Skipping the primer: Painting directly over raw drywall mud causes the patch to absorb paint differently, leaving a dull spot.
- Using the wrong sandpaper grid: Using sandpaper that is too rough tears the paper face of the drywall, making the damage worse.
The Hidden Stress of Having Damaged Walls
Living with damaged walls does more than just ruin your home decor. It actually causes a surprising amount of daily mental stress.
- The fear of losing your security deposit: If you rent, every hole represents money that will be deducted from your deposit when you move out.
- Feeling embarrassed in front of guests: You might hesitate to invite friends over because you worry they will judge your home based on that one hole.
- A loss of pride in your home: Your home is your sanctuary, and when it is damaged, your sense of comfort and pride begins to slip away.
- Anxiety about the repair cost: Hiring a professional contractor can cost hundreds of dollars for a job that takes only a few hours of actual work.
Fortunately, you do not need to spend a fortune or hire a contractor to get smooth walls again. With the right steps, you can do this yourself and achieve a finish that looks completely invisible.
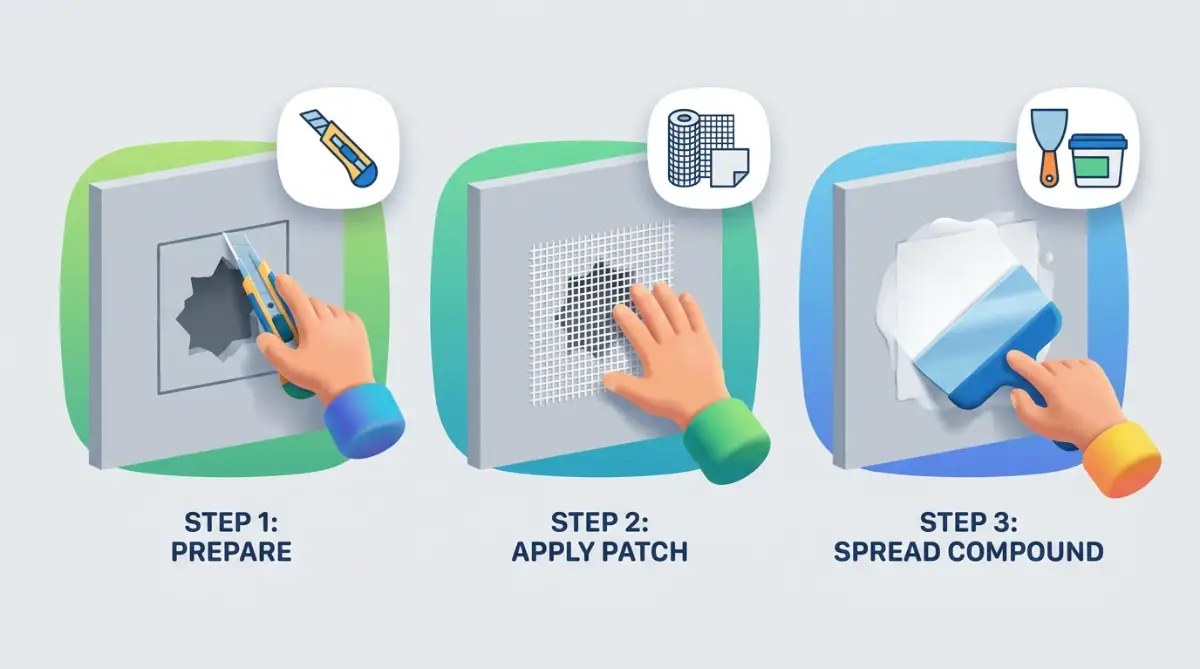
Step 1: Gathering the Right Tools and Preparing Your Workspace
To get a professional finish, you must start with the right gear. Trying to cut corners with household items like butter knives or toothpaste will only lead to a messy, weak patch.
Essential Tools for the Job
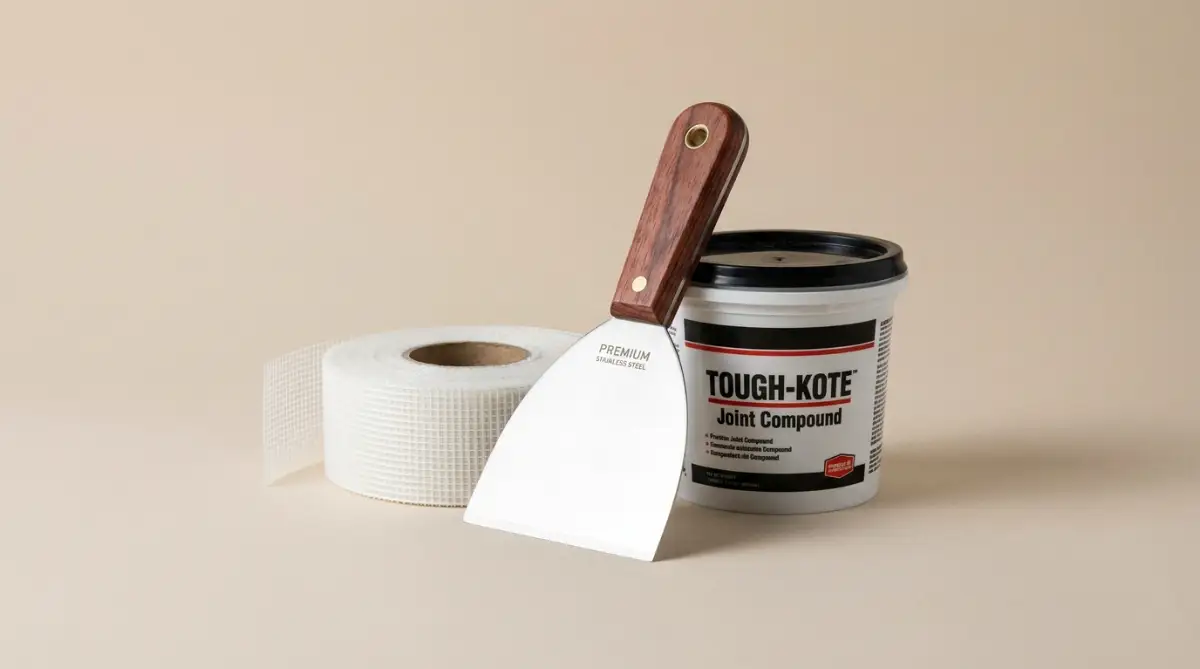
Before you start, head to your local hardware store and grab these items:
- A self-adhesive mesh drywall patch or a small piece of spare drywall sheet.
- A container of premixed joint compound (often called drywall mud).
- A putty knife (a 4-inch knife is great for small holes, while a 6-inch knife works best for feathering).
- A hand sander with fine-grit sandpaper (120-grit and 220-grit).
- A high-quality drywall primer to seal the patch before painting.
- A small roller or paintbrush that matches the texture of your wall.
Preparing the Hole for Repair
Think of this step like preparing a tooth for a filling. If you leave loose debris inside the hole, the patch will eventually fall out.
First, take your utility knife and gently cut away any loose paper or crumbling plaster around the edges of the hole. You want to create clean, solid edges for your patch to cling to.
Next, use a dry cloth or a vacuum brush to clean away all the dust from the area. If there is dust on the wall, your joint compound and tape will not stick properly.
Step 2: Applying the Patch and the Base Layer
Now that your wall is clean and ready, it is time to cover the hole. The method you choose depends heavily on the size of the hole you are dealing with.
For Small Holes (Under 2 Inches)
If your hole is small, like one left by a doorknob or a large drywall anchor, a self-adhesive mesh patch is your best option. These patches are made of strong fiberglass mesh with a sticky backing that clings directly to the wall.
Place the patch directly over the center of the hole. Press it down firmly with your fingers, making sure it lies completely flat against the wall.
There should be no bubbles or loose edges sticking up. If the mesh is too large, you can easily trim it down with utility scissors.
For Medium to Large Holes (Over 2 Inches)
For larger holes, mesh alone will not be strong enough to support the wall. You will need to create a backing support using a small scrap piece of wood.
Once your backing wood is secure, cut a piece of drywall to fit the hole. Screw this new piece into the wood backing, ensuring it sits flush with the existing wall.
Finally, place fiberglass mesh tape over all the seams where the new piece meets the old wall. This tape prevents cracks from forming later when the house naturally settles.
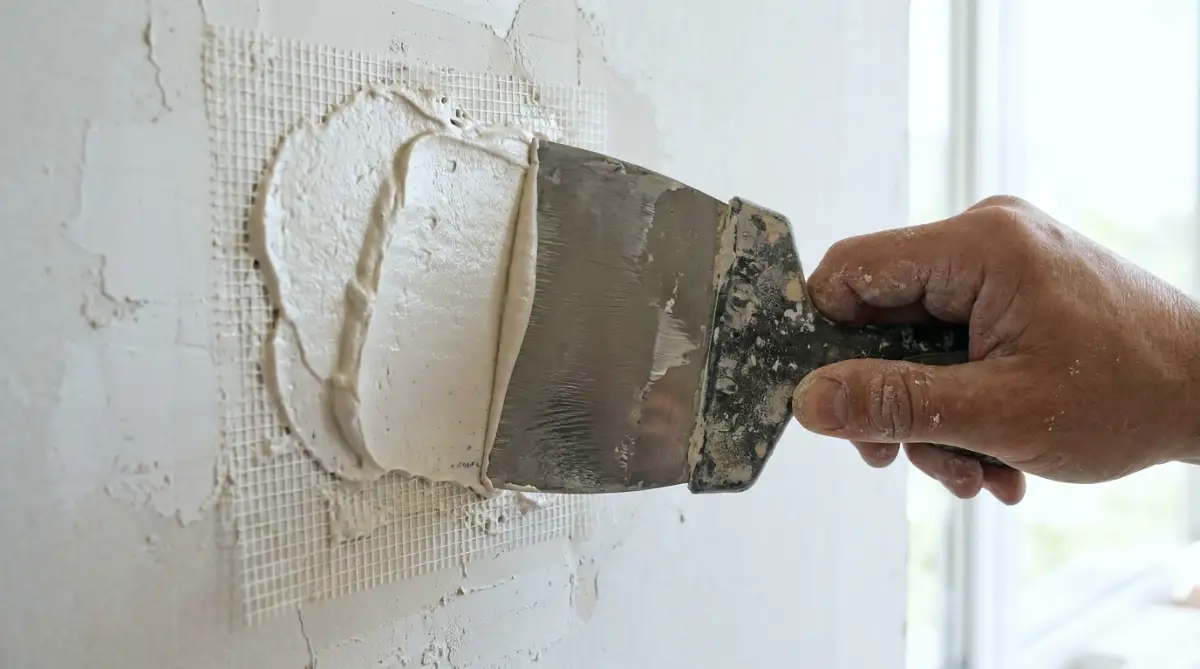
Step 3: Mastering the Art of Spreading Joint Compound
Spreading drywall mud is a lot like spreading cold butter on a delicate slice of bread. If you press too hard, you will tear the paper, but if you do not press hard enough, you get a thick, lumpy mess.
The First Coat of Mud
Scoop a small amount of joint compound onto the edge of your putty knife. Hold the knife at a 30-degree angle against the wall, just above the patch.
In one smooth motion, pull the knife down over the patch, pressing firmly enough to force the mud through the mesh. The goal is to fill the hole and cover the mesh patch completely.
Do not worry about making it look perfect on your very first try. The first coat is meant to build strength, while the later coats will create the smooth surface.
The Secret Technique: Feathering the Edges
Feathering is the single most important technique for making a patch look invisible. It means gradually thinning out the joint compound as you move away from the center of the patch.
To do this, place your putty knife flat against the edge of the wet mud. Tilt the knife slightly so that more pressure is applied to the outer edge than the inner edge.
Gently pull the knife outward, blending the wet mud into the dry, undamaged wall. This creates a slope so gradual that the human eye cannot detect where the repair starts or ends.
Let this first coat dry completely, which usually takes about 4 to 12 hours depending on your room's humidity. You will know it is dry when the dark grey compound turns into a bright, solid white.
Handling the Second Thin Coat
Once the first coat is completely dry, you might notice small ridges or bubbles on the surface. Take your putty knife and gently scrape off any high spots or dried bumps.
Do not sand yet, as this creates a massive cloud of fine dust that gets everywhere. Simply scraping with the blade is enough to prep the surface for the next step.
Now, apply a second, much thinner coat of joint compound. This time, extend the mud about two to three inches past the edges of your first coat.
Feather this second coat even wider than the first one. This step fills in any tiny air pockets or shrinkage dips that happened as the first coat dried.
Let this second coat dry completely overnight. When you wake up, you will have a solid, flat patch that is ready for the final, most satisfying steps of the repair process.
Achieving a Flawless Finish with Pro Sanding and Texturing Techniques
Your patch is dry, but your work is not done yet. Now comes the part where you make that repair blend in so well that nobody will ever know a hole existed.
To get this right, you need to understand how light interacts with your wall. Even the smallest bump or ridge will cast a tiny shadow when light hits it from the side.
Our goal in this section is to eliminate those bumps so the wall remains flat and shadow-free. We will cover the final sanding, texturing, and priming steps in detail.
Step 4: Mastering the Sanding Phase Without Creating a Mess
Many homeowners dread this step because of the fine white dust that spreads everywhere. However, sanding is the secret to a professional-looking repair.
The Dry Sanding Method
For most repairs, a fine 220-grit sanding block is your best tool. Hold the block flat against the wall with your hand, applying only light pressure.
Move the block in gentle, circular motions over the edges of the patch. You are not trying to remove the compound you just applied; you only want to blend the edges.
Keep your movements light and steady. If you press too hard, you will sand right through the compound and expose the mesh tape beneath.
The Dust-Free Wet Sanding Alternative
If you suffer from allergies or want to avoid a dusty cleanup, you can use the wet sanding method. For this, you will need a large, clean drywall sponge.
Dampen the sponge with clean water, making sure to squeeze out all the excess liquid. The sponge should be damp, not dripping wet.
Use the smooth side of the sponge to rub the edges of the patch in circles. The moisture will gently dissolve and smooth out the high spots without releasing dust into the air.
Step 5: Matching the Wall Texture and Priming for Paint
Most residential walls are not perfectly smooth. They often have a subtle texture that looks like the skin of an orange, which builders call orange peel texture.
If you paint directly over a smooth patch on a textured wall, the patch will stand out like a shiny band-aid. We need to recreate that texture before we open the paint can.
Creating the Perfect Texture Match
For light textures, you can purchase a simple texture spray can from your local hardware store. Before spraying your wall, practice on a scrap piece of cardboard to adjust the nozzle.
Hold the spray can about 12 to 18 inches away from the wall. Apply the texture in short, light bursts to build up the pattern slowly.
If your wall has a knockdown texture, wait about ten minutes after spraying for the spots to become semi-dry. Then, gently drag a wide putty knife flat across the wet spots to flatten the tops of the texture bumps.
Why Drywall Primer is Non-Negotiable
Never skip the primer. Raw drywall joint compound is highly porous, meaning it behaves like a dry kitchen sponge.
If you apply wall paint directly onto dry mud, the mud will quickly suck the moisture right out of the paint. This leaves your paint looking dull, flat, and discolored in that specific spot.
Apply one thin, even coat of high-quality drywall primer over the entire patched area. This seals the porous mud and ensures your topcoat of paint sticks evenly.
Step 6: Blending the Paint Color and Sheen
Finding the exact paint to match your wall can sometimes feel like a guessing game. Even if you have the original paint can, the paint on your wall has likely faded over time from sunlight and dust.
Tips for Finding the Right Paint Color
- Take a small chip to the store: Use a utility knife to peel a small one-inch square of paint from a hidden area near the baseboard and take it to a paint retailer for a computer color match.
- Identify the paint sheen: Look at your wall from an angle to see if it is flat, eggshell, satin, or semi-gloss.
- Mix the paint thoroughly: Old paint cans sitting in your garage will settle, so stir them for at least two minutes before using.
The Roller Feathering Technique
To make the paint blend in, do not use a heavy brush stroke right over the patch. Instead, use a small, low-nap paint roller.
Dip the roller into your paint and roll most of the excess paint off onto the tray. You want the roller to be relatively dry as you approach the edges of your patch.
Start painting in the center of the patch and work your way outward. As you reach the outer edges, reduce the pressure on your roller so the paint layers become thinner.
This simple technique is called feathering, and it prevents hard paint lines from forming. Once the first coat dries, apply a second thin coat using the same technique.
Protecting Your Walls From Future Accidental Damage
Once your wall is beautiful and smooth again, you will want to keep it that way. You can take a few simple steps to prevent another hole from appearing in the same spot.
Install Spring-Loaded Door Stops
If a door handle caused the original hole, the best solution is to install a door stop. A simple spring metal door stop screwed into the baseboard costs very little and takes two minutes to install [1].
This prevents the door from ever swinging back far enough to touch the drywall. If you cannot attach a stop to the baseboard, you can buy a rubber bumper that sticks directly over the repaired spot on your wall.
Choose Washable Paint Finishes for High-Traffic Areas
If you have kids or pets, your walls are bound to take a beating. When repainting entire rooms, consider using satin or eggshell paint finishes.
These sheens are much easier to clean and wipe down than flat paints. They resist scuffs and stains, meaning you will not have to sand and paint your walls as often.
Critical Pitfalls to Sidestep During Your Repair
Even with the best instructions, it is easy to make mistakes if you try to rush. Knowing what not to do is just as important as knowing the right steps.
Avoiding these five common mistakes will save you time, money, and frustration.
1. Relying on Cheap Lightweight Spackle for Deep Holes
Many quick-fix wall kits contain lightweight spackle that feels like whipped cream. While this is great for filling tiny nail holes, it should never be used for deep drywall holes.
This lightweight material lacks the structural strength needed to support a larger repair. Over time, changes in room humidity will cause the spackle to shrink, crack, and eventually fall out of the wall.
Always use real joint compound or setting-type compound for actual holes. It dries much harder and bonds securely to the surrounding drywall edges.
2. Completely Skipping the Priming Step
Many people think primer is just a marketing trick to make you buy more paint. This is a costly mistake that will ruin your entire repair job.
Without primer, a phenomenon called paint flashing occurs. The repaired area will look like a dull, flat spot on your wall when light hits it, even if you used the exact same paint color.
A single coat of primer seals the patch and ensures the final paint sheen matches the rest of the wall. It is the only way to get a truly invisible repair.
3. Sanding Too Aggressively with Rough Sandpaper
When you want to finish a project quickly, it is tempting to grab heavy-grit sandpaper to knock down the bumps. However, rough sandpaper will quickly tear the paper backing of your drywall.
Once that paper face is shredded, it becomes fuzzy and rough. No amount of paint will ever make that fuzzy paper look smooth again.
Always stick to fine-grit sandpaper (220-grit) for your finishing steps. Patience during the sanding phase is what separates amateur work from a professional finish.
4. Applying Heavy, Thick Layers of Joint Compound
It is natural to want to fill the entire hole in one single step. However, applying a thick, heavy layer of wet mud will lead to major problems.
Thick mud takes days to dry completely, and as it dries, it will sag and crack. It is much better to apply two or three paper-thin coats of joint compound instead of one thick one.
Thin coats dry quickly and are much easier to sand smooth. This approach actually saves you hours of sanding and waiting time.
5. Trying to Paint Over Dusty or Dirty Walls
If you paint over the fine white dust left behind by sanding, your paint will not stick to the wall. Instead, it will stick to the dust layer.
As the paint dries and shrinks, it will begin to bubble, peel, and flake off the wall in large sheets. You will then have to scrape off the paint and start the entire repair process over again.
Always take a damp microfiber cloth or a sponge and wipe down the repaired area before opening your paint can. A clean surface is essential for a lasting bond.
Taking Charge of Your Home Repairs with Confidence
Fixing a hole in your drywall might seem intimidating at first, but it is a highly rewarding skill to learn. By taking your time and following these steps, you can save yourself hundreds of dollars in repair bills.
Imagine the feeling of looking at your wall and seeing nothing but a smooth, beautiful surface. You will no longer have to worry about guests noticing the damage or landlords taking your hard-earned security deposit.
With a few basic tools and a little patience, you can master this simple home repair. Take a trip to your local hardware store, gather your supplies, and fix that wall hole today.

