The Nightmare of Glitched Fingers and Melted Faces
You spend hours crafting the perfect text prompt, picking the right colors, and waiting with intense excitement for your image to generate. The loading bar reaches completion, and your screen displays a stunning, cinematic portrait with gorgeous lighting.
Your heart sinks as you look closer at the details and notice a horrifying mistake in the composition. The character has six webbed fingers growing from their hand, a melted eyeball sliding down their cheek, or an ear growing out of their neck.
These disturbing anatomical glitches instantly turn your creative joy into a stressful battle of re-rolling prompts over and over. You feel completely helpless and angry at the software, wondering why computers struggle with the most basic parts of human anatomy.
Why Traditional AI Prompt Shortcuts Fail You
When desperate creators try to fix bad hands and blurred faces, they often rely on incorrect methods that end up wasting their time. Rushing to add simple quality words to your prompt without understanding how the model thinks leads to continuous frustration.
Here is why common quick-fix prompt techniques usually fail:
- Adding useless phrases like "perfect hands": The AI model does not know what "perfect" means mathematically, so it ignores the word completely.
- Believing that modern AI can never generate correct anatomy: Assuming the technology is permanently broken keeps you from learning the editing tools.
- Downloading cheap, ad-filled mobile generator apps: Most free phone apps use outdated models that are incapable of rendering complex hand structures.
- Ignoring how diffusion models actually process hands: Failing to realize that the AI sees hands as simple patterns of light and dark causes you to write bad prompts.
- Expecting a flawless image on your very first try: Refusing to use post-processing or inpainting tools ensures your finished artwork will always look glitched.
How Creative Frustration Drains Your Artistic Confidence
Struggling with distorted anatomy does more than just ruin your digital files; it impacts your creative self-esteem.
- Feeling like a failure compared to other creators: You see flawless portraits posted online and assume you are simply not talented enough to use the software.
- Anxiety when sharing your artwork with others: You hold back from posting your creations on social media because you fear people will mock the glitched details.
- Frustration from constantly starting over from scratch: Spending your limited free time generating the same image fifty times drains the fun out of your hobby.
- The feeling of being left behind by technology: Watching new software updates roll out without knowing how to use them makes you feel completely overwhelmed.
Fortunately, you do not need to be a professional graphic designer or a computer programmer to fix these issues. By using smart editing tools and understanding how neural networks process shapes, you can easily repair glitched hands and faces today.
The Practical DIY Roadmap to Flawless AI Anatomy
To fix distorted hands and faces successfully, you must realize that the AI generator does not understand human skeleton structures. The computer is simply trying to recreate patterns of light, shadow, and color that it learned during its training.
Think of your image editing process like a skilled surgeon performing a delicate joint repair.
The Inpainting Surgery Analogy:
=======================================
[Glitched Six-Finger Hand] ---> [Surgical Brush erases the hand]
                                          |
                              (Input targeted prompt: "five fingers")
                                          |
[Glitched Six-Finger Hand] ---> [AI carves out a clean, sharp hand] ---> [Perfect Anatomy!]
=======================================
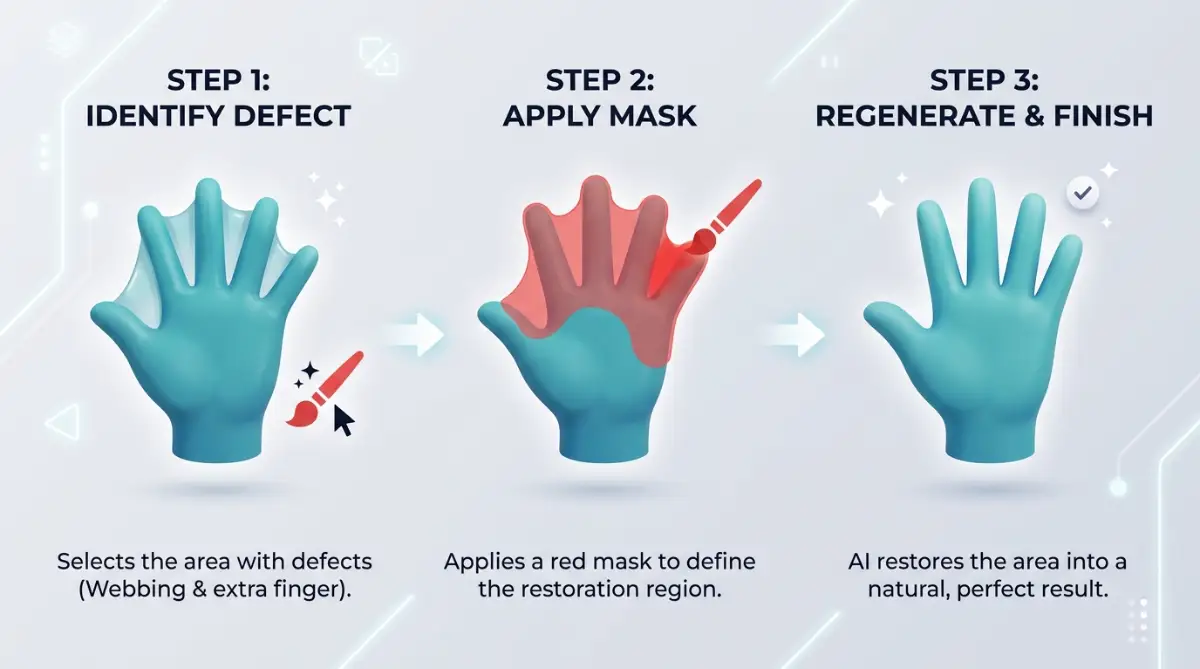
You do not need to throw away the whole body to fix a bad hand; you simply paint over the flawed area and let the AI try again on that specific spot.
We will show you the first three essential steps to perform this digital surgery safely and effectively.
Step 1: The Surgical Precision of Inpainting (Stable Diffusion & Midjourney)
The most powerful tool for fixing anatomical mistakes is a software feature called inpainting (often called "Vary Region" in Midjourney) [50]. This tool acts like a smart digital eraser that lets you target specific areas of your image.
How Inpainting Performs Digital Surgery
Instead of generating a completely new image, inpainting allows you to freeze the beautiful parts of your picture while actively rebuilding the flawed parts.
You simply paint over the bad hand or face with a brush tool, creating a black mask over the glitched area.
How the Inpainting Brush Works:
+---------------------------------------------------------------+
| Step | Action                                                 |
+---------------------------------------------------------------+
| 1    | Load your glitched image into the inpainting editor.   |
| 2    | Brush over the bad hand or face to create a mask.      |
| 3    | Type a simple, specific prompt like "human hand."     |
| 4    | Press generate to let the AI paint a clean replacement.|
+---------------------------------------------------------------+
The AI will ignore the rest of the canvas, focusing all its processing power on drawing a clean, correct hand inside the masked area.
Setting Your Inpainting Parameters
To get the best results, you must set your denoising strength correctly in your software settings.
If you set the denoising strength too low (below 0.3), the AI will simply copy the old glitched six-finger shape.
Denoising Strength Quick-Guide:
------------------------------------------
Too Low (0.2)  -> AI copies the old glitched shape (Fails!)
Perfect (0.6)  -> AI erases the old shape and draws a clean new hand (Success!)
Too High (0.9) -> AI draws something completely unrelated to the body (Fails!)
------------------------------------------
Always set your denoising strength to 0.5 or 0.6 when fixing hands or eyes.
This sweet spot gives the neural network enough freedom to erase the old glitch and draw a clean, correct hand, while keeping the lighting and color matching the rest of the body.
Step 2: Building a Powerful Negative Prompt Shield
If you want to prevent distorted anatomy before it ever appears on your canvas, you must master the art of the negative prompt.
A negative prompt is a list of specific concepts and shapes that you want the generator to actively avoid.
Placing "No Trespassing" Signs on Your Canvas
Think of a negative prompt like placing clear "no trespassing" signs around the edges of your blank canvas.
You are telling the diffusion model: "When you are carving out the image from the static noise, do not use these ugly shapes."
Negative Prompt Action:
=======================================
[Your Negative Prompt List] ---> [Text Encoder Processes Terms] ---> [Erases Bad Shapes from Static]
                                                                                |
                                                                     (No bad shapes appear!)
=======================================
This simple barrier keep malformed limbs, extra digits, and blurred features off your screen.
Crafting Your Negative Prompt List
Avoid writing long, confusing paragraphs; instead, use short, precise tokens separated by commas.
- For hands: "extra fingers, mutated hands, fused digits, missing limbs, malformed fingers, distorted hands"
- For faces: "mutated face, blurred eyes, extra ears, double head, asymmetric features, low quality"
Save this text block in a simple notepad file on your desktop so you can quickly copy and paste it into your generator's negative prompt box before every project.
Using a strong negative prompt is the absolute key to helping the generator maintain clean, human-like anatomical structures.
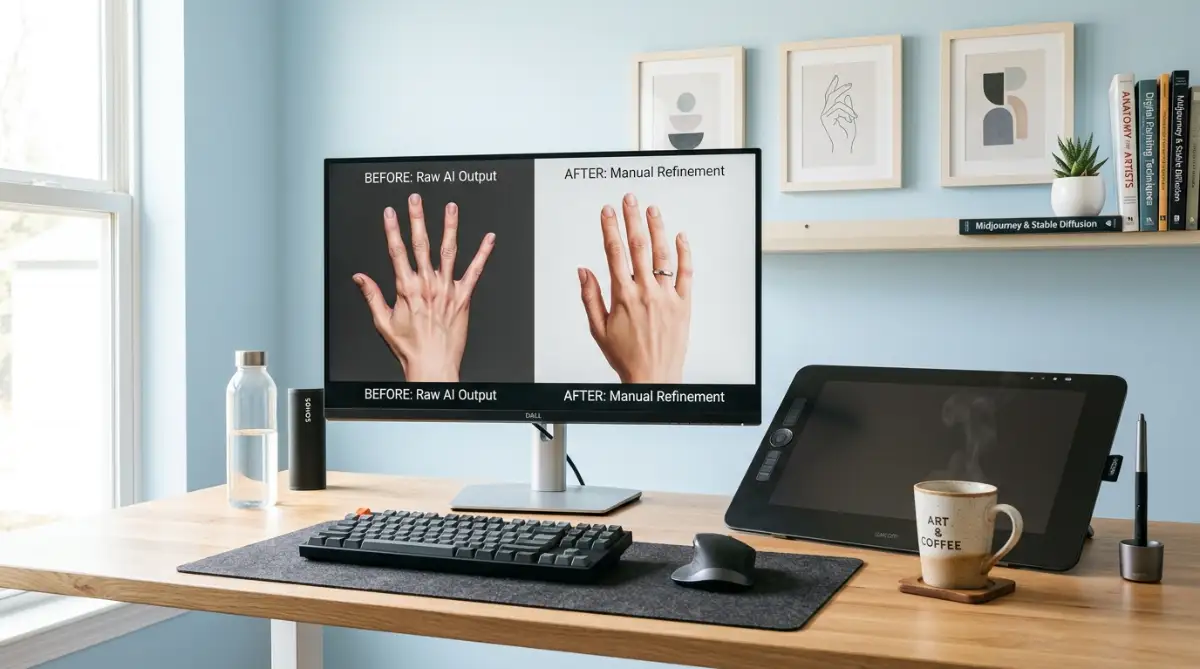
Step 3: Activating Face Restoration Engines (CodeFormer & GFPGAN)
If your generated portrait features a beautiful body but a slightly blurred, melted, or asymmetrical face, you do not need to repaint it by hand.
You can use specialized face restoration engines to clean up the details instantly.
The Magic of Specialized Face Networks
Standard image generators are designed to understand everything from mountains to dogs, which means they do not focus solely on the fine details of human faces.
Face restoration tools like CodeFormer or GFPGAN are neural networks that were trained exclusively on millions of high-resolution human portraits.
How Face Restoration Works:
+---------------------------------------------------------------+
| Step | Action                                                 |
+---------------------------------------------------------------+
| 1    | Load your image with the blurred face into the tool.  |
| 2    | The specialized network spots the eyes, nose, and lips.|
| 3    | It replaces the blurred static with clean, sharp shapes.|
| 4    | It blends the sharp face back onto the original body. |
+---------------------------------------------------------------+
These tools know exactly how the light should reflect off an eyeball and how lips should curve, allowing them to repair melted features in seconds.
Integrating Face Restoration into Your Workflow
Many modern generator platforms have these face restoration engines built directly into their user interface as a simple toggle switch.
If your platform has this feature, check the box marked "Restore Faces" before clicking generate.
If you are using offline software, you can download free face restoration tools and run your finished images through them.
This simple post-processing step instantly upgrades your blurry portrait into a sharp, professional-grade digital painting.
By implementing these three initial training steps, you are successfully taking control of your creative software. Your understanding of inpainting, negative prompting, and face restoration will help you fix distorted details with complete confidence, keeping your finished artwork clean and sharp.
Step 4: Using ControlNet to Guide Hand Placement
For advanced creators, the best way to ensure perfect hand poses is by using a powerful software extension called ControlNet.
ControlNet allows you to upload a simple reference photo of a hand pose, which acts as a structural blueprint for the AI generator.
ControlNet Structural Guidance:
=======================================
[Your Reference Hand Photo] ---> [ControlNet Openpose Model] ---> [Skeletal Wireframe Map]
                                                                            |
                                                                 (Guides the generator)
=======================================
How the Wireframe Blueprint Works
ControlNet analyzes your reference photo and converts it into a simple, multi-colored skeletal wireframe map of the hand.
It tells the generator exactly where the wrist, palm, and five individual fingers should be placed on the canvas.
This structural guidance prevents the AI from getting confused in the static noise, ensuring your character always has perfect, realistic hands.
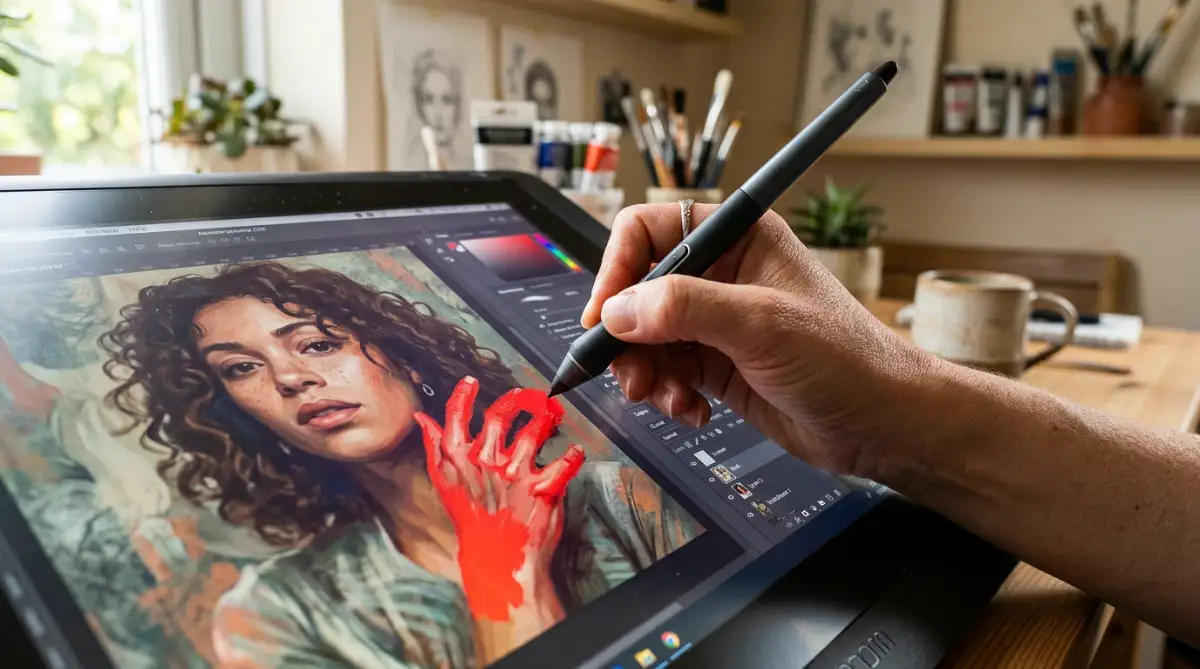
Step 5: Repainting Distorted Details in external Editing Software
Sometimes, an AI-generated hand is so badly mutated that the inpainting brush gets confused and keeps drawing more fingers.
In these difficult cases, you can use simple external photo editing software like Photoshop or Krita to help the AI.
The External Paint-Over Method:
------------------------------------------
Export glitched image -> Erase extra fingers with paint brush -> Import back into inpainting -> Regenerate clean hand
------------------------------------------
The Quick Paint-Over Technique
Export your glitched image and open it in your favorite free photo editor.
Use a simple skin-colored brush tool to paint over the extra sixth finger, covering it completely so the area looks like a normal palm.
You do not need to paint a beautiful, detailed hand; you just need to create a simple, clean shape with five basic fingers.
Import the edited image back into your generator's inpainting tool, brush over your hand edit, and press generate.
The AI will read your simple hand shape as a clean guide, easily converting your rough paint-over into a highly detailed, professional hand.
Critical Mistakes to Avoid on Your AI Editing Journey
Fixing glitched anatomy is a simple process of trial and adjustment, but it is very easy to make mistakes if you do not understand the software.
Knowing what not to do is just as important as knowing the right editing steps.
Avoid these five common errors to keep your digital creations clean, sharp, and professional.
1. Setting Your Inpainting Denoising Strength Too High
One of the most common mistakes is cranking your inpainting denoising strength up to the maximum setting (0.9 or 1.0) when fixing hands.
This high setting tells the generator to completely ignore the rest of the arm, leading to weird, detached hands.
Denoising Strength Efficiency:
=============================================================
Denoising Level:             Resulting Hand Connection:
-------------------------------------------------------------
1. Too High (0.9 to 1.0)     -> Detached hands, mismatching skin colors, weird shapes.
2. Perfect (0.5 to 0.6)      -> Clean, well-connected fingers that match the arm perfectly.
=============================================================
Safety Rule: Keep your inpainting denoising strength around 0.55.
=============================================================
Keep your denoising strength around 0.55 to ensure the new hand connects naturally to the wrist and matches the skin color perfectly.
This stability is what actually allows the neural network to blend your edits seamlessly into the rest of the portrait.
2. Painting Too Wide of a Mask Over the Glitch
When using the inpainting brush, some beginners paint a massive, messy mask that covers the entire arm and chest.
This large mask forces the AI to regenerate areas that were already looking perfect, increasing the risk of new glitches.
Always keep your inpainting mask tight, brushing only over the specific bad fingers or the blurred eye.
This precision saves the generator's processing power, helping it deliver a clean, focused fix.
3. Relying on "Perfect Hands" Prompts Without Negative Weights
As mentioned earlier, typing quality terms like "flawless fingers" in your main prompt box is highly ineffective.
AI models process visual concepts by pushing away from bad shapes, which is why negative prompts are so much more powerful.
Always place your quality constraints inside the negative prompt box instead of your main prompt.
This simple setting ensures the text encoder actively filters out bad shapes from the random noise.
4. Running Face Restoration over Stylyzed Anime or Cartoon Art
Face restoration engines like GFPGAN are trained on realistic human photos, which means they do not understand cartoon proportions.
If you run face restoration over a stylized anime portrait, the tool will try to force realistic human eyes and lips onto the drawing.
This results in a weird, creepy, and highly unnatural mix of drawing and photo styles.
Only use face restoration on realistic photographic portraits, relying on standard inpainting for stylized artwork.
5. Getting Frustrated and Deleting Your Best Compositions
It is completely natural to feel frustrated when a gorgeous image has a bad hand, making you want to delete the file.
Remember that every great piece of digital AI art you see online was likely touched up using inpainting or external editors.
Treat every anatomical glitch as a fun opportunity to practice your digital surgery skills.
With a little patience and a few brushstrokes, you can save your best compositions and turn them into flawless masterpieces.
Embracing the Future of Digital Art with Confidence
Mastering the tools to fix glitched hands and faces is one of the most rewarding steps you can take on your creative journey.
It does not require years of traditional drawing experience, expensive art classes, or a massive budget to achieve success.
By focusing on the power of inpainting, negative prompting, and face restoration, you can transform your creations.
You will feel a wonderful sense of joy and relief every time you watch a glitched hand resolve into a perfect, five-finger masterpiece.
Grab your inpainting brush, apply your negative prompt shield today, and start enjoying the wonderful freedom of flawless digital creativity!