
The Hidden Danger of Leaking Your OpenAI API Keys
Imagine spending days or weeks building an amazing web application. You finally launch it, and the initial feedback is great. Then, a few hours later, you check your billing dashboard and realize you owe thousands of dollars because your private OpenAI API key was leaked to the public.
This is not a rare horror story. It happens to hundreds of developers every single day. When you build AI-powered apps, security cannot be an afterthought.
If you make one tiny mistake, automated bots will scan your code, find your credentials, and drain your budget in minutes. Let us look at why so many people get this wrong and how we can fix it easily.
According to cybersecurity reports and GitHub scanning data, automated search bots can detect leaked API keys in public repositories in under three seconds. This type of credential exposure falls directly under "Security Misconfiguration," which is consistently ranked as a major vulnerability in the OWASP Top 10 security standards. Ensuring your keys are kept out of the codebase is not just a best practice—it is an industry-standard requirement for any production-ready application.
Why Standard Solutions Often Fail Developers
Many developers run into major issues because they rely on bad advice or quick tutorials online. Here are the most common reasons why people fail to protect their setups:
- Using Frontend API Calls: Many tutorials show you how to call OpenAI directly from a React, Vue, or vanilla Javascript frontend. This is incredibly dangerous because anyone can open the browser developer tools and copy your key instantly.
- Accidental GitHub Commits: It is very easy to write your API key directly in your main code file. If you push that file to a public repository on GitHub, bots will steal your key within seconds.
- Believing in Obfuscation: Some developers try to hide their keys by scrambling the text or using basic encryption tools on the frontend. This is useless because smart tools can easily reverse-engineer frontend code.
- Storing Credentials in Local Storage: Storing sensitive access tokens in the user's browser local storage leaves them open to cross-site scripting attacks.
How Security Anxiety Harms Your Development Journey
When you do not feel confident about your app's security, it affects your entire workflow. Here is how this constant worry impacts your creative process:
- Fear of Unexpected Bills: You might wake up in the middle of the night just to check your API usage, fearing a sudden financial emergency.
- Loss of Professional Trust: If a client or user discovers that your app is insecure, you lose your reputation and their trust immediately.
- Development Paralysis: You might stop building new, exciting AI tools altogether because the fear of getting hacked feels too overwhelming.
- Wasted Time on Bad Fixes: Instead of building great features, you spend hours writing complex, homemade security systems that still fail.
Building Your Secure OpenAI Shield: Three Practical Steps
The good news is that securing your OpenAI API integration in Node.js is not difficult if you follow the right framework. By setting up a simple backend, using environment variables, and limiting traffic, you can build a highly secure system.
Let us go through the practical, step-by-step process to secure your application right now.
Step 1: Storing Secrets Safely Using Environment Variables
The very first rule of web security is simple. Never write your secret API keys directly inside your main code files.
Instead, you must use environment variables. Think of environment variables as a private safe inside your computer or server.
Your code can read the values from this safe when it runs, but the actual keys are never written in the code itself. This prevents you from accidentally sharing your secrets if you upload your code to GitHub.
To do this in a Node.js project, we use a very popular package called dotenv. Let us set up a clean project and configure it.
First, open your terminal, create a new folder for your project, and initialize it.
mkdir secure-openai-app
cd secure-openai-app
npm init -y
Now, we need to install the essential packages. We will install Express for our server, the official OpenAI library, and the dotenv library.
npm install express openai dotenv
Once the installation is complete, create a file named .env in the root folder of your project. This is where you will store your private keys.
Open the .env file in your text editor and add your OpenAI API key like this:
OPENAI_API_KEY=your_actual_openai_api_key_here
PORT=3000
Replace your_actual_openai_api_key_here with the real key from your OpenAI developer dashboard. Do not use quotes around the key, and do not add spaces around the equals sign.
Next, you must create a file named .gitignore in your root folder. This file tells Git which files it should never upload to your online repository.
Inside your .gitignore file, write the following lines:
node_modules/
.env
By adding .env to this file, you ensure that your secret key will stay on your local computer. It will never be pushed to GitHub, even if you make your repository public.
Now, let us write a simple test script to make sure Node.js can read your secret key safely. Create a file named app.js and add the following code:
// Load the environment variables from our .env file
require('dotenv').config();

// Access the key using process.env
const apiKey = process.env.OPENAI_API_KEY;

if (!apiKey) {
  console.log("Error: We could not find your OpenAI API key.");
} else {
  console.log("Success: Your API key is loaded safely.");
}
Run this file in your terminal by typing:
node app.js
If everything is set up correctly, you will see the success message. This means your code can now use your API key without exposing it to the outside world.
Step 2: Creating a Secure Backend Proxy with Express
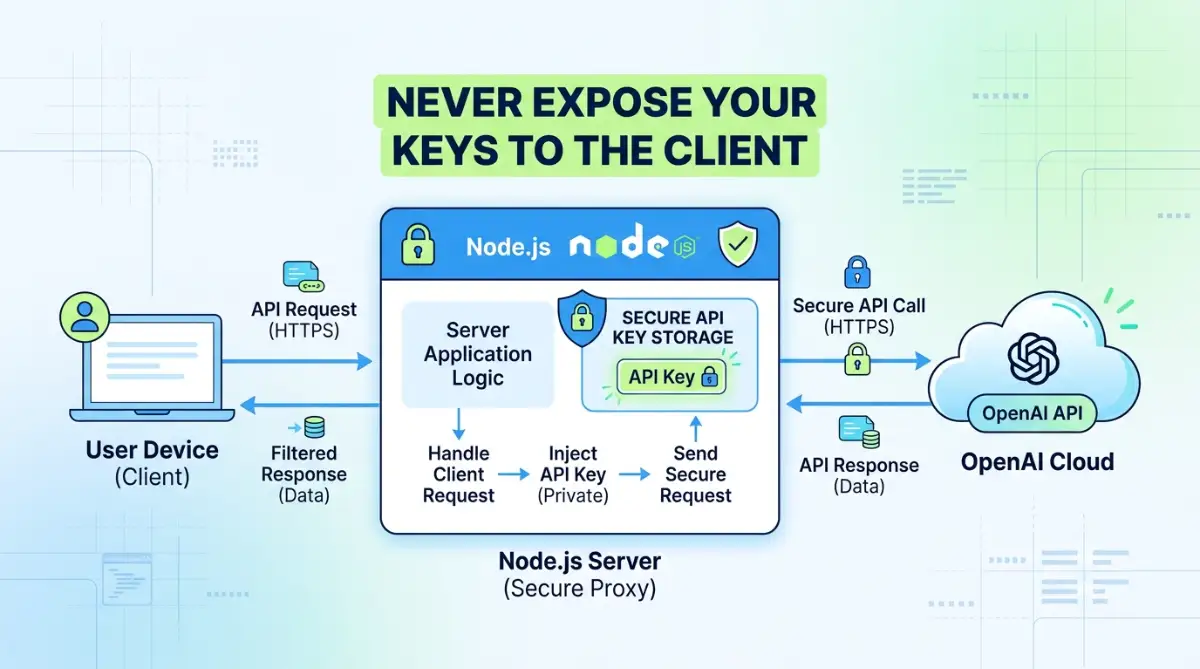
Now that your key is stored safely in an environment variable, you need to make sure your frontend never requests it. To do this, we will build a backend proxy.
Think of a backend proxy as a waiter in a restaurant. When a customer wants food, they do not go into the kitchen and touch the ingredients.
They tell the waiter what they want, the waiter goes to the kitchen, gets the food, and brings it back to the customer. Your Node.js server is the waiter.
Your frontend app will talk only to your Node.js server. Your Node.js server will then talk to OpenAI using your secret key. This keeps your key completely hidden from the user's web browser.
Let us write the code to set up this secure backend proxy. Open your app.js file and replace its contents with the following secure Express server setup:
// Load our environment variables
require('dotenv').config();

const express = require('express');
const { OpenAI } = require('openai');

const app = express();
const port = process.env.PORT || 3000;

// Enable Express to read JSON data sent from the frontend
app.use(express.json());

// Initialize the OpenAI client with your hidden API key
const openai = new OpenAI({
  apiKey: process.env.OPENAI_API_KEY,
});

// Create a secure endpoint for our frontend to use
app.post('/api/generate-text', async (req, res) => {
  try {
    const { userPrompt } = req.body;

    // Check if the user prompt is empty
    if (!userPrompt) {
      return res.status(400).json({ error: "Please provide a valid prompt." });
    }

    // Call the OpenAI API safely from our server
    const response = await openai.chat.completions.create({
      model: "gpt-4o-mini",
      messages: [
        { role: "system", content: "You are a helpful assistant." },
        { role: "user", content: userPrompt }
      ],
      max_tokens: 150,
    });

    // Send only the necessary response back to the client
    const generatedText = response.choices[0].message.content;
    res.json({ result: generatedText });

  } catch (error) {
    console.error("Error with OpenAI API:", error.message);
    res.status(500).json({ error: "An error occurred while processing your request." });
  }
});

// Start our secure server
app.listen(port, () => {
  console.log(`Your secure server is running on port ${port}`);
});
Let us look closely at why this setup is so secure:
- No Exposed Credentials: The frontend only sees the /api/generate-text link. It never sees the OpenAI key or the OpenAI API headers.
- Controlled Output: The server only sends back the final generated text message. It does not send back unnecessary metadata that could expose system details.
- Central Error Handling: If the OpenAI API fails or returns an error, the detailed system error is logged on your private server. The user only gets a generic, safe error message so hackers cannot learn about your system through error codes.
To run this secure server, type the following command in your terminal:
node app.js
Now, your backend is ready. Any frontend app can now send a post request
To help you understand how your frontend communicates with this secure proxy, here is a simple JavaScript code snippet using the standard browser fetch API. You can use this inside your frontend React, Vue, or vanilla Javascript file:
async function generateAIResponse(prompt) {
  try {
    const response = await fetch('http://localhost:3000/api/generate-text', {
      method: 'POST',
      headers: {
        'Content-Type': 'application/json',
      },
      body: JSON.stringify({ userPrompt: prompt }),
    });

    const data = await response.json();

    if (response.ok) {
      console.log("AI Response:", data.result);
      return data.result;
    } else {
      console.error("Server Error:", data.error);
    }
  } catch (error) {
    console.error("Network Error:", error.message);
  }
}
to http://localhost:3000/api/generate-text with a JSON body, and your server will handle the AI generation safely.
Step 3: Implementing Rate Limiting and Input Validation to Prevent Abuse
Even if your API key is hidden behind a server, your app can still be a target. If a malicious user finds your backend endpoint, they can write a simple script to spam it.
This would make your backend send thousands of requests to OpenAI, which would still result in a massive bill for you. To prevent this, we must set up rate limiting and validate all user inputs.
Rate limiting restricts the number of requests a single user can make in a specific amount of time. If a user tries to send fifty requests in a minute, your server will block them.
To implement rate limiting, we will use a highly trusted package called express-rate-limit. Let us install it first.
Open your terminal and run:
npm install express-rate-limit
Now, let us add this security layer to our Express server. Open your app.js file and modify it to include the rate limiter. We will also add some simple input validation to keep our system clean.
require('dotenv').config();

const express = require('express');
const { OpenAI } = require('openai');
const rateLimit = require('express-rate-limit');

const app = express();
const port = process.env.PORT || 3000;

app.use(express.json());

// Set up the rate limiting rule
const apiLimiter = rateLimit({
  windowMs: 15 * 60 * 1000, // This defines a 15-minute window
  max: 20, // Limit each IP address to 20 requests per window
  message: {
    error: "Too many requests from this IP. Please try again after 15 minutes."
  },
  standardHeaders: true, // Return rate limit info in the headers
  legacyHeaders: false, // Disable old rate limit headers
});

// Apply the rate limiter specifically to our AI endpoint
app.use('/api/generate-text', apiLimiter);

const openai = new OpenAI({
  apiKey: process.env.OPENAI_API_KEY,
});

app.post('/api/generate-text', async (req, res) => {
  try {
    const { userPrompt } = req.body;

    // 1. Basic Input Validation
    if (!userPrompt || typeof userPrompt !== 'string') {
      return res.status(400).json({ error: "Invalid prompt format." });
    }

    // 2. Length Validation to prevent ultra-long prompts that drain tokens
    if (userPrompt.trim().length > 300) {
      return res.status(400).json({ error: "Prompt is too long. Please keep it under 300 characters." });
    }

    // 3. Clean the input to remove any potential dangerous script tags
    const sanitizedPrompt = userPrompt.replace(/<[^>]*>/g, '').trim();

    if (sanitizedPrompt.length === 0) {
      return res.status(400).json({ error: "Prompt cannot be empty." });
    }

    // Call OpenAI with the sanitized input
    const response = await openai.chat.completions.create({
      model: "gpt-4o-mini",
      messages: [
        { role: "system", content: "You are a helpful assistant." },
        { role: "user", content: sanitizedPrompt }
      ],
      max_tokens: 150,
    });

    const generatedText = response.choices[0].message.content;
    res.json({ result: generatedText });

  } catch (error) {
    console.error("Error details:", error.message);
    res.status(500).json({ error: "Our server encountered an issue." });
  }
});

app.listen(port, () => {
  console.log(`Your secure server is running with rate-limiting on port ${port}`);
});
Let us look at how these updates protect your wallet:
- IP Address Tracking: The rate limiter tracks users by their IP address. If a user tries to abuse your system, they will get a 429 Too Many Requests status code.
- Prompt Length Limits: By limiting the prompt to 300 characters, we prevent users from pasting entire books into our app. This keeps your token usage low and predictable.
- Sanitization: We remove HTML or script tags from the input. This prevents malicious prompts from confusing the AI or causing web security issues in your database.
- Note on Production-Grade Validation: While using a simple Regular Expression (Regex) to strip HTML tags is a great starting point for beginners, it is not 100% foolproof against advanced injection attacks. For professional and commercial applications, it is highly recommended to use robust, community-tested validation libraries like Zod or Joi to validate input schemas, and DOMPurify to sanitize any string data before processing it on your server.
Managing Your OpenAI Budget Directly in the Dashboard
Even with top-tier security code, you should always set up financial safety nets. OpenAI provides great budget tools on their platform dashboard that you should set up right now.
First, log in to your OpenAI developer dashboard and navigate to the "Billing" section. Look for a tab called "Usage Limits" or "Limits."
Here, you can set two types of monthly spend limits:
- Soft Limit: You can set a dollar amount that triggers an automatic email alert when your usage goes over a certain number. For example, if you set it to $10, you will get an email warning you that your budget is being used up.
- Hard Limit: This is your ultimate safety net. If your usage hits this set amount, OpenAI will block all further requests for the rest of the month. Setting this to $20 means you will never, under any circumstances, owe more than $20 a month.
These limits are completely free to set up and take less than two minutes. They provide absolute peace of mind while you are testing and growing your app.
Best Practices for Hosting Your Secure Node.js App
When you are ready to move your app from your local computer to a live hosting service, you need to keep security in mind. Hosting platforms handle environment variables differently than local systems.
Never upload your .env file to your hosting provider. Most hosting platforms like Render, Heroku, or Railway have a special dashboard section for configuration values.
Look for a tab named "Environment Variables," "Config Vars," or "Secrets" on your hosting platform's web dashboard. Add your OPENAI_API_KEY there as a key-value pair.
The platform will inject this key safely into your running application process. This keeps your credentials secure during the deployment process.
Additionally, make sure you configure your Cross-Origin Resource Sharing (CORS) settings correctly on your server. By default, any website can try to send a request to your API.
By using the cors package in Express, you can limit access to your API so that only your personal frontend website is allowed to communicate with your backend. Let us install it to see how it works.
npm install cors
Then, you can add it to your server configuration like this:
const cors = require('cors');

// Allow requests only from your official live frontend domain
const corsOptions = {
  origin: 'https://your-official-website.com',
  optionsSuccessStatus: 200
};

app.use(cors(corsOptions));
This simple configuration ensures that even if someone finds your backend URL, they cannot make requests to it from their own external websites. It blocks unauthorized clients from abusing your server resource.
By implementing these straightforward, practical methods, you can build powerful AI-enabled applications without worrying about key theft or sudden bills. Security is not about writing complex code; it is about building clean, smart layers that protect your resources at every step of the journey.
We have already established the basic structure of a secure Node.js application. Now, we must focus on high-level protection to keep our system absolutely safe from advanced threats. Following secure coding practices is the smartest way to make sure your applications remain stable under high traffic.
When you build apps that call external services, you have to look at the entire lifecycle of your code. By matching your backend setup with the Node.js security guidelines, you build a safe environment for your users. Additionally, reading the official OpenAI developer platform recommendations helps you align your server setup with industry standards.
Let us jump directly into the advanced methods that protect your budget and data.
Going Beyond the Basics: Advanced Safeguards for Your AI Server
Building a basic server is a great start, but serious applications need stronger defenses. To run a safe service in production, you must verify who is calling your backend and how your keys are managed. Let us explore the advanced strategies that top-tier development teams use to keep their systems safe.
Adding User Authentication with JSON Web Tokens
Hiding your OpenAI key behind an Express server is safe only if you restrict who can access your server. If your /api/generate-text endpoint is open to the public, anyone can still use your server to generate free text. To stop this, we need to add an authentication layer using JSON Web Tokens (JWT).
Think of JWT as a digital concert ticket. When a user logs into your web application, your server gives them an encrypted ticket. Every time the user wants to generate AI content, their browser must show this ticket to your backend. If the ticket is valid, your server contacts OpenAI.
Let us write a Node.js middleware to verify these digital tickets before passing requests to OpenAI. First, install the JSON Web Token package in your project.
npm install jsonwebtoken
Now, create an authorization middleware inside a file named authMiddleware.js. This code will check the headers of incoming requests for a valid token.
const jwt = require('jsonwebtoken');

// A simple middleware function to protect our AI route
function verifyUserToken(req, res, next) {
  // Extract the authorization header from the incoming request
  const authHeader = req.headers['authorization'];

  // Check if the header exists and starts with "Bearer "
  if (!authHeader || !authHeader.startsWith('Bearer ')) {
    return res.status(401).json({ error: "Access denied. No security token provided." });
  }

  // Get the actual token string from the header
  const token = authHeader.split(' ')[1];

  try {
    // Verify the token using your private JWT secret key
    const verifiedUser = jwt.verify(token, process.env.JWT_SECRET);

    // Attach the verified user details to the request object
    req.user = verifiedUser;

    // Move on to the next function in our Express route
    next();
  } catch (error) {
    // If verification fails, return an error immediately
    return res.status(403).json({ error: "Invalid or expired security token." });
  }
}

module.exports = verifyUserToken;
Secure Express Server Setup] To use this middleware in your primary application, simply import it and pass it to your POST endpoint. Here is how your updated route definition will look:
const verifyUserToken = require('./authMiddleware');

// We insert the verification middleware right before our actual request handler
app.post('/api/generate-text', verifyUserToken, async (req, res) => {
  // Your secure OpenAI API code lives inside here
  // Now, only authenticated users can run this code
});
Using this approach, you make sure that only registered, logged-in users can use your AI features. This completely blocks unauthorized strangers and automated internet bots from running up your bills.
Keeping Secrets Safe with Cloud-Based Vault Systems
While storing your keys in a .env file is much safer than placing them in your code, it still has some limitations. If someone gains unauthorized access to your server's filesystem, they can read your .env file in plain text. For production-ready applications, it is better to load your keys dynamically from a cloud secret manager.
Think of a secret manager as an ultra-secure, external bank vault for your data. Services like Google Cloud Secret Manager, AWS Secrets Manager, or Doppler store your keys with advanced encryption. Your Node.js application fetches the keys directly into memory when the server boots up.
This approach means your API keys are never stored on your server's local hard drive. It also makes key rotation incredibly easy. You can change your OpenAI key inside your cloud vault without needing to redeploy or modify your server's application code.
If you are using a hosting platform like Render, Railway, or Heroku, you do not need complex code to use this system. You can simply write your keys into the platform's "Environment Variables" dashboard. The platform acts as a secure key manager, injecting the secrets safely into your application environment at runtime.
Setting Up Automated Security Monitoring and Alerting
Security is not a set-it-and-forget-it task. To protect your application over the long term, you must observe how your API is being used. Setting up automated monitoring allows you to catch suspicious behavior before it turns into a financial crisis.
You can use basic monitoring systems to track how many requests your Node.js server receives every hour. If your average traffic is fifty requests per hour, and suddenly it spikes to five thousand requests, you need to know about it instantly. You can write custom code to send an email or a Slack alert if traffic exceeds a safe limit.
Let us write a simple logging system that tracks high-frequency requests from a single user. This helps you identify if a specific user account has been compromised or is abusing your system.
// A simple function to log request counts for audit purposes
function logApiUsage(userId, action) {
  const timestamp = new Date().toISOString();
  // In a real application, you would save this to a database or a file
  console.log(`[AUDIT LOG] User: ${userId} | Action: ${action} | Time: ${timestamp}`);
}
Regularly checking your OpenAI usage dashboard is another important practice. Set a reminder on your calendar to review your spending reports once a week. This habit ensures that you always stay in control of your operational budgets.
A Crucial Note on AI Response Streaming (SSE)
When you build highly interactive AI applications, you might want the AI's response to stream word-by-word to your users rather than waiting for the entire paragraph to load.
If you enable stream: true in your OpenAI API call, your Express backend proxy cannot send a standard JSON response. Instead, you must configure your server route to support Server-Sent Events (SSE). This requires setting your headers to 'Content-Type': 'text/event-stream' and 'Cache-Control': 'no-cache', and then piping the OpenAI data stream chunk-by-chunk directly to the frontend client. Keep this in mind as you scale your backend proxy structure.
Keeping Your Backend Packages Updated
The software world changes quickly, and new security bugs are found in common packages every week. If you do not update your Node.js dependencies, your server can become vulnerable to automated hacks. You should regularly audit your project packages to make sure they are clean and secure.
Fortunately, Node.js has a built-in tool that makes security audits incredibly easy. Open your terminal in your project directory and type:
npm audit
This command scans all your installed packages and compares them against a global database of known security threats. If it finds any issues, it will tell you exactly which packages are vulnerable and how to fix them.
To fix most common security issues automatically, you can run:
npm audit fix
By running these simple commands once a week, you keep your system updated with the latest security patches. This small habit blocks hackers from using old, known exploits to break into your server.

Five Costly Blunders That Can Break Your App Security
Even when developers have the best intentions, simple mistakes can still lead to major security gaps. Understanding these common pitfalls is the best way to prevent them from happening to you. Let us explore five frequent errors that can expose your OpenAI keys and damage your application.
Mistake 1: Hardcoding Keys "Just for a Quick Test"
This is perhaps the most common way API keys are leaked onto the public internet. A developer is in a hurry to test a new feature, so they paste their actual OpenAI key directly into their code. They promise themselves that they will delete it before committing the code to Git.
However, developers are human, and it is incredibly easy to forget. The quick test works, the code is saved, and a few minutes later, the file is pushed to GitHub with the active key inside. Automated crawlers scan GitHub constantly, and your key will likely be stolen before you even realize your mistake.
Always take the extra thirty seconds to set up a .env file, even for tiny personal tests. It is a simple habit that will save you from major financial headaches.
Mistake 2: Creating the .gitignore File Too Late
Many developers write their code first, commit their files, and then decide to create a .gitignore file. This is a massive mistake because of how Git tracks file history. Once a file has been committed to Git's history, adding it to .gitignore later does not delete it from past commits.
If you push your repository to GitHub, a hacker can easily look through your commit history and find the old version of the file containing your secret key. The only way to fix this is to delete the entire repository or use advanced tools to purge your Git history.
To avoid this headache, always create your of starting any new project. It should be the first file you create after running npm init.
Mistake 3: Forgetting to Set Hard Spend Limits on OpenAI
Relying solely on your code security without setting a budget cap is like driving a car without insurance. No matter how secure your Node.js code is, an unexpected system bug or server issue could still cause an endless loop of API calls.
If you do not have a hard spend limit configured on your OpenAI billing dashboard, that loop will run until your credit card is completely empty. OpenAI offers incredibly simple budgeting tools for this exact reason.
Always set your monthly hard limit to an amount you can easily afford to lose. If you are just testing, set your limit to ten or twenty dollars to ensure your bank account remains secure.
Mistake 4: Showing Detailed Error Messages to Your Users
When an error occurs on your server, Node.js generates a detailed technical report called a stack trace. This report shows the exact file names, folder paths, and library code where the failure happened.
If you pass this raw error message back to your frontend, you are giving malicious users a blueprint of your system. They can use this internal information to find other weak spots in your server structure.
Always write clean try-catch blocks that log the detailed error privately on your server. For your frontend users, always return a friendly, generic message like "Our system is busy right now. Please try again soon."
Mistake 5: Allowing All Domains in Your CORS Configuration
When you set up Cross-Origin Resource Sharing (CORS), it is tempting to use the wildcard symbol * to make everything work quickly. This wildcard tells your Node.js server to accept requests from any website on the internet.
While this makes testing easy, it allows bad actors to build copycat websites that make calls directly to your backend API. They can steal your server resources and run up your billing usage without your consent.
Always specify your exact website domain in your CORS settings when you push your application to production. This small security step keeps your backend exclusive to your own frontend application.
Empowering Your Development with Safe and Confident AI Apps
To wrap things up, building AI-powered web applications is one of the most exciting areas of software development today. By taking the time to build a secure backend, you protect your bank account and gain the freedom to build amazing features with confidence.
Secure OpenAI API Integration in Node.js. The steps we have covered are simple to implement, yet they provide industry-standard protection. You do not need to be a security scientist to build a safe application; you just need to follow these core steps:
- Keep your API keys completely hidden behind a secure Node.js proxy server.
- Store all your private details in environment variables and use a .gitignore file from day one.
- Add rate limiting to stop automated spam bots from abusing your endpoints.
- Require simple user authentication before processing expensive AI requests.
- Set up monthly billing alerts and hard spending limits directly in your OpenAI dashboard.
By applying these practical steps today, you can focus on what truly matters: writing great code, helping your users, and bringing your creative ideas to life. Open your code editor now, set up your secure backend, and build your next great AI tool with complete peace of mind.
Disclaimer:
This guide is intended for educational purposes only. While the security practices discussed in this article follow standard web development guidelines, no online system is entirely immune to threats. Developers are encouraged to perform regular security reviews and consult with professional security experts before launching commercial applications.