
The Hidden Danger of Exposed API Keys: Why Your Web App Might Be at Risk
Imagine spending weeks building a beautiful, smart web application. You write the code, design a clean interface, and finally connect it to the OpenAI API. You launch your project online, share it with your friends, and go to bed feeling proud.
The next morning, you wake up to a shocking email from OpenAI. Your account credit is completely gone, or worse, you have a massive bill waiting for you.
This is not a rare accident. It happens to thousands of developers every single day. The main reason is simple: they put their private API keys directly into their frontend code.
When you do this, anyone who visits your website can easily find your key. They just need to open the developer tools in their browser and look at the network requests. Within seconds, your private key is stolen, shared, and abused by automated bots.
Why Finding the Right Security Solution Feels So Hard
Many developers try to fix this issue but end up getting lost in a sea of confusing advice. Here are some of the common reasons why people struggle to find a clean, safe path:
- Misleading Quick-Start Tutorials: Many online tutorials show you how to call the OpenAI API directly from React, Vue, or plain JavaScript. These guides prioritize speed over safety, leaving beginners with a false sense of security.
- Confusing Cloud Settings: Some platform guides suggest complex cloud setups, identity management systems, or serverless functions. If you are just starting out, these tools can feel overwhelming and hard to configure correctly.
- Outdated Code Examples: You might find forum answers that recommend old libraries or practices that are no longer safe. This leads to broken code and leaves your server open to other security threats.
- Copy-Pasting Without Understanding: It is easy to copy a block of backend code without knowing how it works. When something breaks, you cannot debug it, which often leads to disabling security features just to make it run.
How Security Anxiety Hurts Your Development Journey
Living with the fear of a leaked key can seriously damage your confidence as a creator. It affects both your project and your peace of mind in several ways:
- Fear of Deploying Your Work: You might keep your project running only on your local computer because you are scared of what might happen if you put it online.
- Constant Financial Anxiety: Every time you check your phone, you might worry about unexpected API bills. This stress takes away the joy of building helpful AI tools.
- Loss of Motivation to Learn: When security feels too complicated, you might give up on your project entirely. You start to think that building real-world AI applications is only for large teams with massive security budgets.
- Doubt in Your Coding Abilities: Facing a hacked system or a drained API account can make you feel like an amateur. It makes you question whether you are cut out for software development.
Thankfully, there is a simple, standard way to solve this. By building a small backend proxy with Node.js and Express, you can keep your secrets safe. Let us walk through how this works and how you can set it up today.
How to Build a Secure Express Bridge for OpenAI API Calls
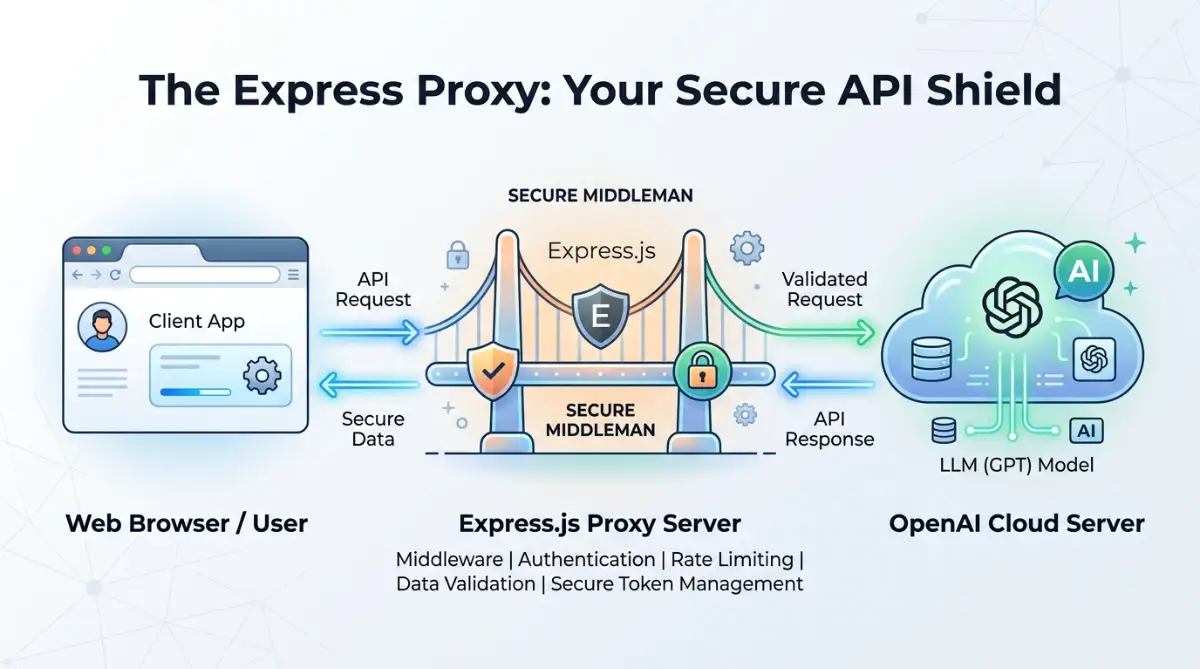
The safest way to use the OpenAI API is to keep your key on a private server. Your user's browser will talk to your server, and your server will talk to OpenAI. This middleman setup is called a backend proxy server.
Your backend acts like a locked vault. Your frontend app asks the vault for help, and the vault fetches the data safely without ever showing anyone the key.
Let us build this system from scratch. We will use Node.js and Express to create a clean, secure, and fast bridge.
Step 1: Setting Up Your Secure Environment Variables
The first step to safety is making sure your API key never lives inside your code files. We do this by using environment variables. These are special settings stored on your computer or server, not in your code repository.
First, let us create a new folder for your project. Open your terminal and run these commands:
Bash
mkdir secure-openai-proxy
cd secure-openai-proxy
npm init -y
Now, we need to install the necessary tools. We will install Express for our server, Dotenv to read our secret keys, CORS to control who can talk to our backend, and the official OpenAI library.
Bash
npm install express dotenv cors openai express-rate-limit
Once the installation is done, create a file named .env in the root of your project folder. This is where your secrets will live. Add your OpenAI API key to this file like this:
Env
PORT=5000
OPENAI_API_KEY=your_actual_openai_api_key_here
FRONTEND_URL=http://localhost:3000
Now, we must make sure we never upload this .env file to public websites like GitHub. To do this, create a file named .gitignore in the same folder and add this line:
Text
node_modules
.env
Think of the .gitignore file as a shield. It tells your code tracking system to completely ignore your secret files, keeping your keys safe from public eyes.
"We recommend using Node.js LTS version and verified NPM packages as of late 2025/2026."
Step 2: Building Your Backend Proxy Server with Express
Now that our environment is ready, we can write our server code. Create a new file named server.js in your project folder.
We will write a simple, clean script. This server will listen for requests from your frontend, send them to OpenAI, and return the answer.
Here is the complete, secure code for your backend:
JavaScript
// Load our secret environment variables
require('dotenv').config();

const express = require('express');
const cors = require('cors');
const { OpenAI } = require('openai');

const app = express();
const PORT = process.env.PORT || 5000;

// Initialize the OpenAI client with our hidden API key
const openai = new OpenAI({
  apiKey: process.env.OPENAI_API_KEY,
});

// Configure CORS to only allow your trusted frontend website
const corsOptions = {
  origin: process.env.FRONTEND_URL || 'http://localhost:3000',
  optionsSuccessStatus: 200,
};

// Apply our middleware
app.use(cors(corsOptions));
app.use(express.json());

// Create a safe endpoint for chat completions
app.post('/api/chat', async (req, res) => {
  const { userPrompt } = req.body;

  // Basic validation to check if the user sent a prompt
  if (!userPrompt || typeof userPrompt !== 'string') {
    return res.status(400).json({
      error: 'Please provide a valid prompt as a string.'
    });
  }

  try {
    // Send the request to OpenAI safely from our backend
    const response = await openai.chat.completions.create({
      model: 'gpt-4o-mini',
      messages: [{ role: 'user', content: userPrompt }],
      max_tokens: 150,
    });

    // Return only the text back to the user's browser
    const aiAnswer = response.choices[0].message.content;
    return res.status(200).json({ answer: aiAnswer });

  } catch (error) {
    console.error('OpenAI API Error:', error.message);

    // Hide deep system errors from the public to stay secure
    return res.status(500).json({
      error: 'Something went wrong while communicating with the AI service.'
    });
  }
});

// Start the server
app.listen(PORT, () => {
  console.log(`Secure proxy server is running on port ${PORT}`);
});
Let us break down why this code keeps you safe. First, notice that the OPENAI_API_KEY is never written in plain text. It is loaded safely from the environment using process.env.
Second, we set up CORS (Cross-Origin Resource Sharing). By using our FRONTEND_URL config, we tell our server to only accept requests coming from our own website. If a random hacker tries to send requests to your server from another domain, your server will block them.
Third, our error handling blocks detailed system messages. If OpenAI returns an error containing sensitive server data, your users will only see a friendly, generic error message. This keeps your system setup completely private.
Step 3: Protecting Your Server with Rate Limiting
Even if your API key is hidden, bad actors can still abuse your backend. They might write a script to send thousands of requests to your new /api/chat endpoint. This could still run up a massive bill on your OpenAI account.
To stop this, we need to add a speed limit to our server. We will use a tool called express-rate-limit. This tool counts how many requests come from a single user and blocks them if they go too fast.
Let us add a rate limiter to our server.js file. Open your file and add these lines near the top:
JavaScript
const rateLimit = require('express-rate-limit');

// Define a rate limit rule
const apiLimiter = rateLimit({
  windowMs: 15 * 60 * 1000, // 15 minutes
  max: 20, // Limit each IP to 20 requests per window
  message: {
    error: 'Too many requests from this device, please try again after 15 minutes.'
  },
  standardHeaders: true, // Return rate limit info in the headers
  legacyHeaders: false, // Disable old rate limit headers
});

// Apply the limit only to our AI routes
app.use('/api/', apiLimiter);
This simple addition acts like a security guard at your door. If someone tries to spam your app, they will get a polite rejection message. This keeps your system running smoothly and protects your budget.
Step 4: Connecting Your Frontend Application Safely
Now that your secure server is ready, how do you talk to it from your frontend code? It is incredibly simple. Instead of fetching data from OpenAI directly, you fetch it from your local server.
Here is a simple example using standard JavaScript fetch in your browser code:
JavaScript
async function askTheAI(promptText) {
  const backendUrl = 'http://localhost:5000/api/chat';

  try {
    const response = await fetch(backendUrl, {
      method: 'POST',
      headers: {
        'Content-Type': 'application/json',
      },
      body: JSON.stringify({ userPrompt: promptText }),
    });

    const data = await response.json();

    if (!response.ok) {
      throw new Error(data.error || 'Failed to get a response.');
    }

    // Use the safe response in your web page
    console.log('AI Response:', data.answer);
    return data.answer;

  } catch (error) {
    console.error('Error talking to backend:', error.message);
    alert('Could not get an answer: ' + error.message);
  }
}
Notice how clean this frontend code is. It does not contain any passwords, secret tokens, or sensitive configurations. You can safely share this frontend code with the entire world, put it on GitHub, or publish it to any free hosting provider.
Step 5: Setting Up Safe Limits in Your OpenAI Dashboard
Code security is only half the battle. You should also set up safety nets inside your OpenAI account dashboard. This is your final line of defense if things go wrong.
Log into your OpenAI platform account and navigate to the billing section. Look for a setting called Usage Limits. Here, you should set two important values:
- Soft Limit: This will send you an email alert once your monthly spending hits a specific amount (for example, $10). It serves as an early warning signal.
- Hard Limit: This will completely stop all API requests once spending hits a higher amount (for example, $25). This ensures you can never wake up to an unexpected bill.
Setting these limits gives you absolute peace of mind. Even if someone finds a way to bypass your rate limits, your total financial risk is capped at a very small, manageable number.
Troubleshooting Common Setup Issues
When building your first backend proxy, you might run into a few common bumps. Here is how to solve them quickly:
1. The CORS Error in the Browser
If you see an error in your browser console mentioning "CORS" or "Cross-Origin Request Blocked," it means your backend is blocking your frontend.
- Double-check your .env file on the server.
- Make sure your FRONTEND_URL matches your frontend port exactly (e.g., http://localhost:3000 or http://localhost:5173).
- Remember that http://localhost:3000 and http://127.0.0.1:3000 are seen as different URLs by security systems.
2. The Process Env is Undefined
If your server crashes saying it cannot read your API key, your environment variables are not loading.
- Make sure require('dotenv').config(); is at the very top of your server.js file.
- Confirm that your .env file is in the root directory, not hidden inside a sub-folder.
- Check that there are no spaces around the equal sign in your .env file (e.g., use PORT=5000, not PORT = 5000).
3. Rate Limiter Blocking Your Own Tests
If you get a "Too many requests" error while trying to test your app, your rate limits might be too tight for local development.
- You can temporarily increase the max limit in your rate limiter code while building.
- Alternatively, you can disable the rate limiter middleware while testing on your local machine and turn it back on before publishing.
Simple Practices for Long-Term Safety
To finish up our setup, let us look at some quick habits that will keep your systems clean and safe over time:
- Rotate Your API Keys Regularly: It is a smart idea to create a new API key and delete the old one every few months. This limits the damage if a key was accidentally exposed in the past.
- Never Use One Key for Multiple Projects: Create a unique API key for every app you build. If one app gets compromised, your other projects will remain completely safe.
- Keep Your Packages Updated: Run npm update occasionally to make sure your Express and CORS libraries have the latest security patches installed.
- Monitor Your Server Logs: Look at your server dashboard from time to time. If you notice unusual spikes in traffic, someone might be trying to find weaknesses in your endpoints.
Building a secure backend does not have to be painful. By taking a few extra minutes to set up an Express proxy, you protect your wallet, secure your application, and build real-world software development skills that will serve you well for years to come.
Going Beyond the Basics: Professional Setup for Real-World Apps
Once your proxy server is up and running, you might think your job is done. But a basic server is just a starting point. Real-world applications face heavy traffic, unexpected crashes, and smart bad actors who try to bypass your simple defenses.
To turn your setup into a strong, enterprise-grade system, you need to apply some advanced security patterns. Let us explore three professional steps that will make your backend proxy incredibly secure.
Step 4: Adding Secure Headers and Input Sanitization
Your server must protect itself from basic web attacks like cross-site scripting and header injection. Express is fast, but its default settings expose some internal details that hackers can use to target your application.
We can fix this easily by adding a package called Helmet. Helmet is a collection of small middleware functions that set secure HTTP response headers.
Bash
npm install helmet DOMPurify jsdom
Now, let us update our code to use these protective tools. We will add Helmet to our middleware chain and set up a sanitizer to clean up the prompts sent by our users.
JavaScript
const helmet = require('helmet');
const createDOMPurify = require('dompurify');
const { JSDOM } = require('jsdom');

// Create a window object so DOMPurify can run on the server
const window = new JSDOM('').window;
const DOMPurify = createDOMPurify(window);

// Use Helmet to secure HTTP headers
app.use(helmet());

// Clean user input before sending it to OpenAI
function cleanUserInput(input) {
  if (typeof input !== 'string') return '';
  // Remove any HTML tags, script scripts, or malicious formatting
  return DOMPurify.sanitize(input.trim());
}
By sanitizing the text, we prevent users from trying to inject code into our backend. This keeps your server clean and ensures that only raw, safe text reaches the OpenAI API.
Step 5: Implementing User Authentication Middleware
If you leave your Express proxy completely public, anyone can write a simple program to send requests directly to your backend endpoint. Your rate limiting will slow them down, but they can still use up your server resources.
To stop this, we must make sure only registered, logged-in users can access our AI tools. We can do this by checking for a security token in the request headers.
Let us build a simple authentication middleware. This script checks for a JSON Web Token (JWT) or a custom session key before letting the request proceed to the OpenAI API.
JavaScript
// A simple middleware function to verify our users
function verifyUserToken(req, res, next) {
  const authHeader = req.headers['authorization'];

  if (!authHeader || !authHeader.startsWith('Bearer ')) {
    return res.status(401).json({
      error: 'Access denied. No security token provided.'
    });
  }

  const token = authHeader.split(' ')[1];

  try {
    // In a real app, you would verify the JWT token using your database secret
    // For this example, we will assume a simple secret matches
    if (token !== 'your-trusted-app-session-token') {
      return res.status(403).json({ error: 'Invalid or expired token.' });
    }

    // If the token is correct, move on to the actual API call
    next();
  } catch (error) {
    return res.status(403).json({ error: 'Failed to authenticate request.' });
  }
}

// Apply the authentication step to your chat route
app.post('/api/chat', verifyUserToken, async (req, res) => {
  // Your secure OpenAI code goes here
});
With this middleware in place, your proxy server is locked down tight. Unauthenticated web scraping scripts will get blocked immediately at your server gate without ever touching your OpenAI budget.
Step 6: Handling Streaming Responses Securely
When you use ChatGPT, you notice that the text appears on your screen word-by-word. This is called streaming. If your backend proxy waits for the entire AI response to finish, your users might stare at a blank loading screen for ten or fifteen seconds.
To make your app feel fast, your proxy must stream the data from OpenAI directly to the user's browser. We can achieve this securely by using Server-Sent Events (SSE).
Let us see how to write a streaming endpoint in your Express server. This method keeps your connection secure while delivering real-time responses to your users.
JavaScript
app.post('/api/chat/stream', verifyUserToken, async (req, res) => {
  const { userPrompt } = req.body;
  const safePrompt = cleanUserInput(userPrompt);

  if (!safePrompt) {
    return res.status(400).json({ error: 'Please provide a valid prompt.' });
  }

  // Set the correct headers for server-sent events
  res.setHeader('Content-Type', 'text/event-stream');
  res.setHeader('Cache-Control', 'no-cache');
  res.setHeader('Connection', 'keep-alive');

  try {
    const stream = await openai.chat.completions.create({
      model: 'gpt-4o-mini',
      messages: [{ role: 'user', content: safePrompt }],
      stream: true,
    });

    for await (const chunk of stream) {
      const content = chunk.choices[0]?.delta?.content || '';
      if (content) {
        // Write each tiny chunk of text back to the browser immediately
        res.write(`data: ${JSON.stringify({ text: content })}\n\n`);
      }
    }

    // Tell the browser that the stream is finished
    res.write('data: [DONE]\n\n');
    res.end();

  } catch (error) {
    console.error('Streaming error:', error.message);
    res.write(`data: ${JSON.stringify({ error: 'An error occurred during streaming.' })}\n\n`);
    res.end();
  }
});
Using this setup, the security layer remains entirely on your backend. Your browser clients never see your API key, yet they enjoy a fast, modern, real-time typing effect.
Managing Your Secrets Across Different Hosting Platforms
When you decide to deploy your proxy server to production, you will use platforms like Render, Railway, or Heroku. Each platform handles environment variables differently. Let us look at how to set them up safely without committing files to code repositories.
- On Render: Go to your dashboard, select your Web Service, and click on the Environment tab. Add your key as OPENAI_API_KEY and set your value there. Render loads these keys directly into memory when your app starts.
- On Railway: Navigate to your project, click on Variables, and press Add Variable. This keeps your configuration completely separate from your codebase.
- On Heroku: Use the dashboard or run the command line utility: heroku config:set OPENAI_API_KEY=your_key_here.
By letting the hosting platform handle your variables, you eliminate the risk of accidental exposure. Your local machine keeps its .env file, and your production server gets its keys dynamically through safe system configurations.

Five Dangerous Pitfalls That Will Break Your Secure Connection
Even experienced developers make simple mistakes when setting up API connections. Let us look at the five most common errors people make, how they can hurt your project, and how you can avoid them.
1. Accidentally Committing Your Dotenv File to GitHub History
This is the number one way API keys get stolen. A developer creates a .env file, forgets to write a .gitignore file, and pushes the entire folder to a public GitHub repository.
Even if you delete the file in a second commit, your key is still visible in your Git history. Automated bots search GitHub commit histories every second looking for secrets. If you commit a key, you must delete that key inside your OpenAI dashboard immediately and generate a new one.
To prevent this, always create your .gitignore file before running your first git add command. Make sure it contains both node_modules and .env on separate lines.
2. Leaving Your CORS Policy Wide Open to the World
When developers struggle to get their frontend and backend to talk to each other, they often take a shortcut. They install CORS and configure it like this:
JavaScript
// DANGEROUS: Do not do this in production
app.use(cors({ origin: '*' }));
Setting your origin to * means any website on the internet can send requests to your server. If a hacker notices your app, they can write a simple script hosted on their own server to send thousands of requests to your backend proxy.
Your server will happily process them, and you will pay for the API bills. Always lock down your CORS configuration to your specific, trusted frontend domain.
3. Using Client-Side Framework Environment Variables
Many developers use modern tools like Vite, React, or Next.js. These frameworks allow you to use environment variables that start with prefixes like VITE_ or NEXT_PUBLIC_.
JavaScript
// DANGEROUS: This key will be visible in the final website build!
const apiKey = import.meta.env.VITE_OPENAI_API_KEY;
It is vital to understand that any variable with these prefixes is bundled into the final JavaScript files sent to the browser. Anyone who inspects your public website code can extract these keys with ease. Only load your secret keys on your Express backend using standard Node.js process.env commands.
4. Forgetting to Handle Timeout Errors Properly
If the OpenAI API experiences a slow network moment or a temporary outage, your Express server might wait indefinitely for a response. If dozens of users make requests at the same time, your server will freeze, run out of memory, and crash.
Always implement a timeout limit on your server requests. You can do this by setting a timeout configuration on your fetch commands or using an Express middleware like connect-timeout.
JavaScript
const timeout = require('connect-timeout');

// Halt the request if it takes longer than 15 seconds
app.use('/api/', timeout('15s'));
app.use(haltOnTimeout);

function haltOnTimeout(req, res, next) {
  if (!req.timedout) next();
}
This prevents your server from getting stuck in limbo when external APIs are having connectivity issues.
5. Storing Your Entire API Secret Key in Your Logs
When debugging code, it is tempting to print out everything to the console to see what is going wrong. You might write code like this:
JavaScript
// DANGEROUS: This prints your secret key to your server logs
console.log('Server config loaded:', process.env);
Most cloud platforms store your server logs in database files. If someone gets unauthorized access to your hosting dashboard, they can read your logs and steal your keys.
Never print out complete secret keys or configuration objects in your logs. If you need to print a key for debugging, print only the first four and last four characters to verify its identity.
Building with Professional Confidence
Protecting your web application is not about writing complex, confusing code. It is about setting up a clear, logical architecture where your secrets stay on the server and your frontend remains simple and clean.
By moving your OpenAI API calls to a private Express server, you protect yourself from massive unexpected bills and keep your data safe. You also learn how real-world developers structure modern web systems.
Here is a quick summary of your secure path forward:
- Store secrets safely: Keep your keys in a .env file and never share it.
- Build a backend bridge: Use Express and Node.js to route your requests.
- Lock the gates: Implement CORS and rate limits to keep bad actors away.
- Keep users validated: Add simple token checks to ensure only real users can run your code.
Now is the perfect time to build your project. Open up your terminal, create your proxy server, and deploy your AI tools with complete confidence. Your users will enjoy a fast, modern experience, and you will sleep easily knowing your keys are safe.
Disclaimer:
This article is for educational purposes only. Security practices can vary based on your specific application design, traffic load, and hosting environment. Always conduct thorough testing before deploying security-sensitive code to a live production server.