The Cold, Expensive, and Uncomfortable Reality of Drafty Windows
It is a freezing winter evening, and you are trying to relax on your living room couch. You have already cranked up your central thermostat, yet you can still feel a cold, invisible shiver crawling across your shoulders.
You look toward your windows and hear a faint, ghostly whistle as the freezing outside wind forces its way inside. If you sit close to the glass, you can feel a continuous stream of ice-cold air flowing directly onto your neck.
Your heating system is running constantly to fight this cold air, and your home is losing warm air just as fast as it is being produced. It feels like you are literally throwing your hard-earned money right out of the window.
Why Many Homeowners Face Costly Mistakes and Bad DIY Advice
When trying to stop cold air leaks, many people panic and use incorrect methods that end up wasting their time and money. Rushing into a quick fix without the right knowledge can lead to frustration and ruined window frames.
Here are the main reasons why common DIY window sealing methods often fail:
- Using cheap household tape: Many people apply regular packaging tape or masking tape to seal gaps, which falls off within days and leaves a sticky, ruined paint surface behind.
- Stuffing gaps with dirty newspaper: Packing paper or fabric rags into window tracks looks terrible, blocks natural light, and fails to stop the actual air pressure.
- Applying permanent glue or caulk: Homeowners sometimes glue their windows shut permanently, making it impossible to open them safely in case of an emergency.
- Ignoring the window frame cleaning step: Trying to stick adhesive foam tape over layers of old dust and dirt ensures the tape will peel off almost immediately.
- Skipping the draft test first: People often buy expensive materials and apply them to the wrong areas of the window, leaving the real leak completely open.
The Hidden Stress and Financial Burden of Cold Air Leaks
Living in a drafty house does more than just make you shiver; it impacts your physical comfort, mental peace, and monthly budget.
- Anxiety over monthly utility bills: Every time the wind blows, you know your energy bills are spiking, causing constant financial stress during the winter months.
- Continuous family health issues: Drafty rooms cause uneven indoor temperatures, which can lead to dry skin, throat irritation, and frequent colds for your children.
- The loss of a cozy home environment: Your home should be a warm sanctuary, but cold drafty rooms force you to wear heavy winter coats indoors.
- Frustration from constant heating noise: Your loud heating furnace has to cycle on and off constantly to keep up, creating a noisy environment.
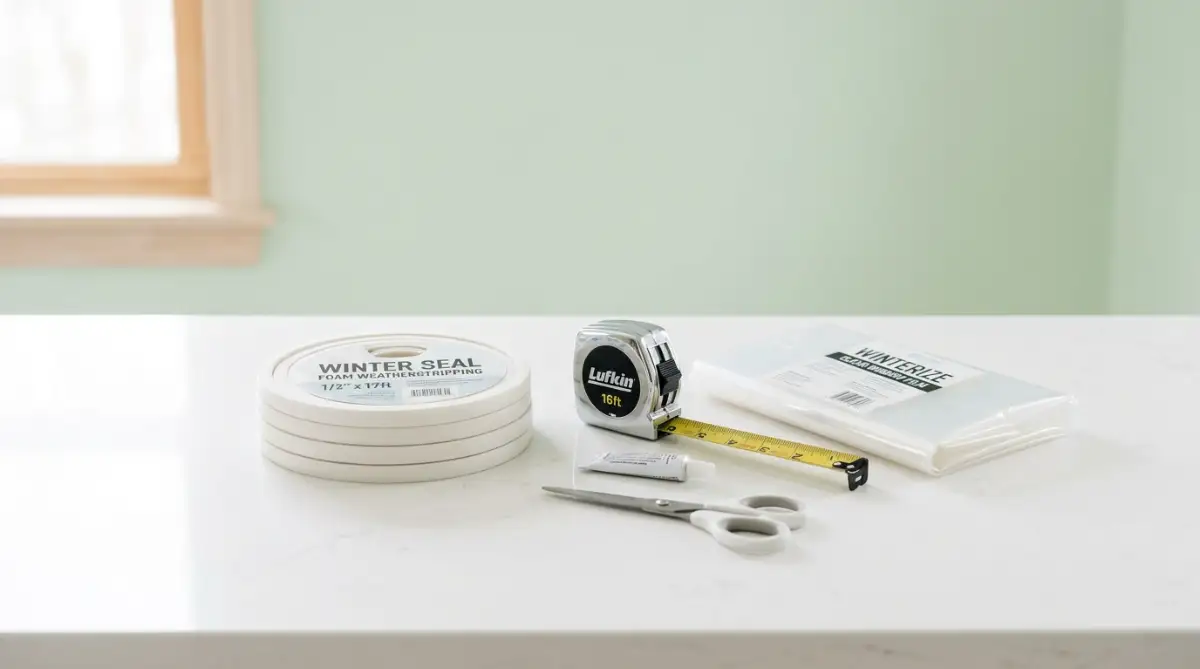
Fortunately, you do not need to replace your windows to enjoy a warm, draft-free home. With a few simple, budget-friendly materials, you can seal those leaks yourself and start saving money on your heating bills today.
The Step-by-Step Educational Guide to Sealing Window Drafts
To get the best results, we must approach this task with a clear plan. Sealing a window is like patching a small leak in a boat; you need to find the hole first, clean the area, and apply the correct sealant.
We will break down the first three steps of the process so you can start keeping your home warm and cozy.
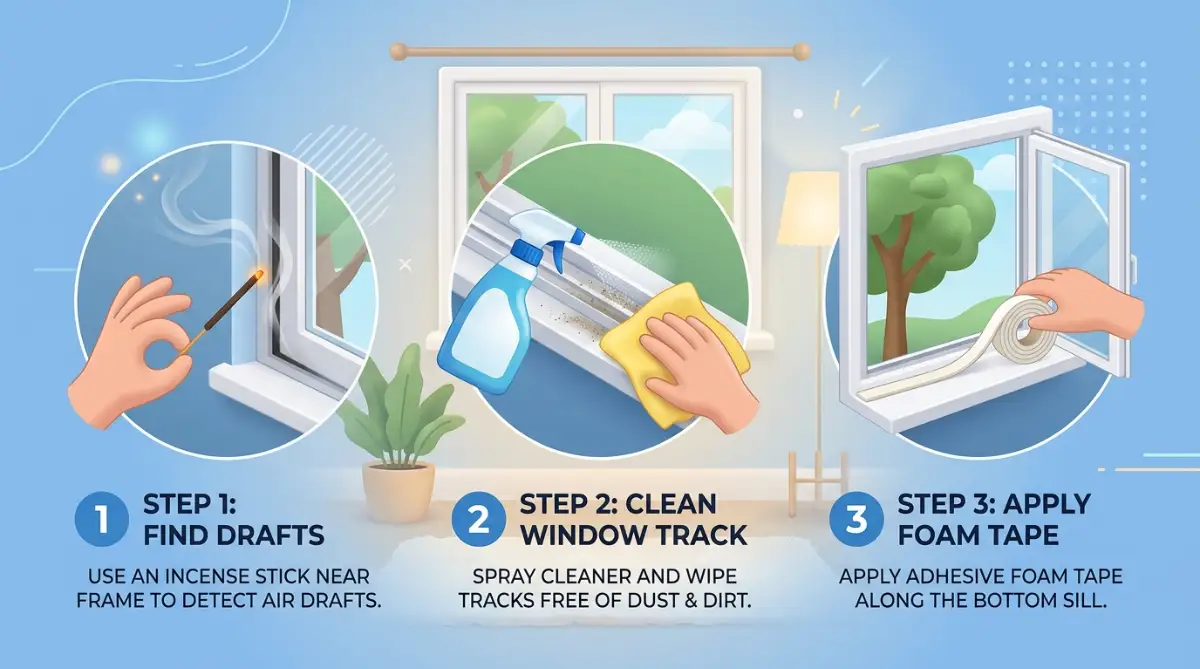
Step 1: Finding the Hidden Leaks (The Inspection Stage)
Before you buy any materials, you must pinpoint exactly where the cold air is sneaking in. Windows have many joints and moving parts, and drafts can hide in unexpected places.
We will use two simple, highly reliable home tests to locate these hidden leaks.
The Lit Incense or Candle Test
This is a classic and highly effective method for spotting subtle air currents inside your home.
First, turn off all your fans, space heaters, and your main furnace to make the indoor air as still as possible.
Light a stick of incense or a small candle and hold it slowly near the edges of your window frame.
Move the smoking stick slowly along the top sash, the side tracks, and the bottom sill.
If the smoke stays calm and rises straight up, that section of your window is well-insulated.
If the smoke flutters, bends, or blows sideways, you have found an active air leak that needs to be sealed.
The Dollar Bill Test
Another great way to test the strength of your window seals is by using a simple dollar bill or a slip of paper.
Open your window, place the paper bill halfway across the frame, and close the window tightly over it.
Now, try to pull the paper bill out of the closed window.
If the paper slides out easily with no resistance, your window latches are loose and are letting cold air pass through.
If the paper is held tightly in place and is difficult to pull, your window seals are working correctly in that spot.
Step 2: Preparing and Cleaning the Frame (The Foundation Stage)
Once you know where the leaks are, you must prepare the surface of your window frame. Applying weatherstripping over dust, moisture, or old crumbling foam is a recipe for failure.
Removing the Old, Worn-Out Materials
Think of this step like preparing a wall before you paint it.
If you leave old, flaky materials in place, the new adhesive will not have a solid surface to cling to.
Use a flat putty knife or a scraper to remove any old, hardened foam weatherstripping from the tracks.
If there is old, cracked caulking along the window trim, gently scrape it away until you see the clean wood or vinyl underneath.
Be careful not to scratch the window frame or damage the glass pane during this process.
The Deep Cleaning Process
After removing the old materials, you need to clean away all the microscopic dust, pollen, and grease.
Mix a few drops of natural dish soap with warm water and wipe down the entire window sill and frame with a cloth.
Allow the window frame to dry completely before moving to the next step.
Finally, wipe the area with a small cotton ball dipped in rubbing alcohol.
This removes any remaining invisible oils, ensuring your new weatherstripping tape will bond to the frame for years.
Step 3: Selecting and Applying the Right Weatherstripping
There are many different types of weatherstripping available at hardware stores, and choosing the right one can feel overwhelming.
The material you choose depends on the size of your window gaps and how often you plan to open and close the window.
Choosing Your Sealing Material
- Adhesive Foam Tape: This is the easiest and most popular option for beginner DIYers. It is made of soft, compressible foam with a sticky backing, making it perfect for sealing uneven gaps along the top and bottom of your window sash.
- V-Strip (Tension Seal): This is a durable plastic or metal strip folded into a "V" shape. It is ideal for the sides of sliding windows because it slides smoothly while maintaining a tight, springy seal.
- Felt Strips: These are inexpensive, traditional woven wool strips that work well for old wooden windows. However, they should not be used in areas exposed to rain or heavy moisture, as felt can rot over time.
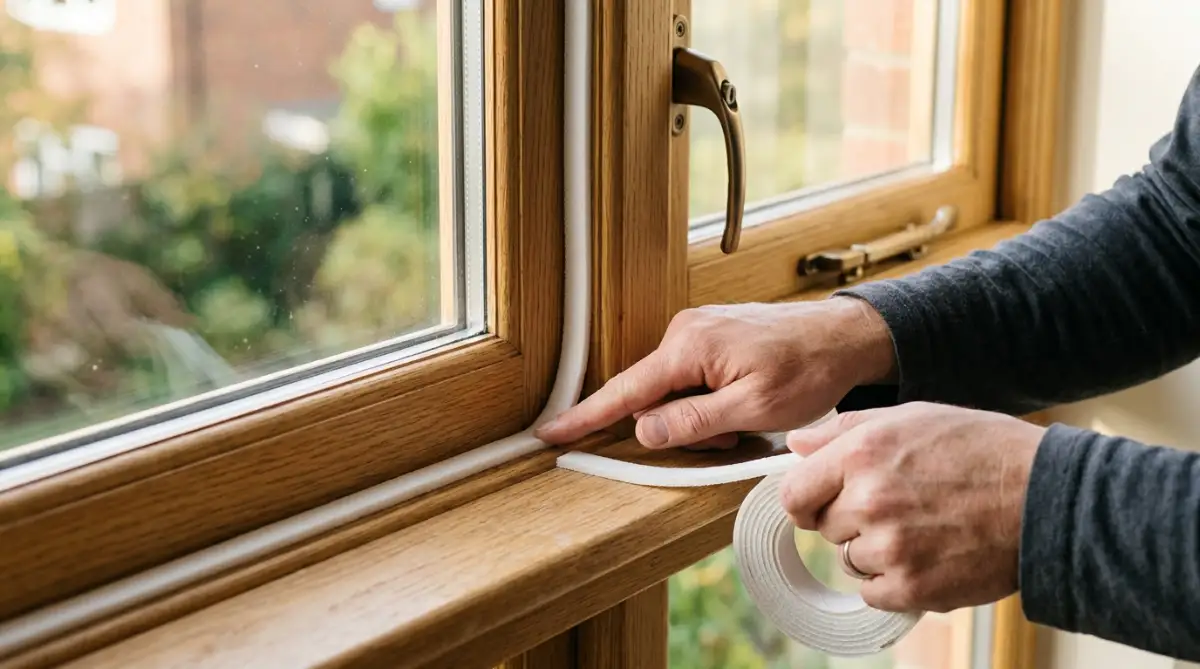
How to Install Foam Weatherstripping Tape
To apply the foam tape, measure the width of your window sill using a measuring tape.
Cut the foam strip to the exact length using a pair of sharp scissors.
Do not peel off all the protective paper backing at once, as this can make the tape difficult to handle.
Peel away the first six inches of backing paper and press the sticky side firmly into the corner of your window frame.
Slowly pull away the remaining backing paper as you guide and press the tape down the length of the frame.
Avoid stretching the foam as you apply it, as stretched foam will eventually shrink and leave gaps at the ends.
Once the tape is in place, press down on it firmly with your fingers for ten seconds to activate the pressure-sensitive adhesive.
Close the window tightly to compress the foam, creating an airtight seal that keeps your warm indoor air safe from the freezing cold outside.
By completing these three initial steps, you have laid the groundwork for a highly insulated, energy-efficient home. Your living spaces will immediately feel warmer, and your heating system will not have to work nearly as hard to maintain a comfortable temperature.
Step 4: Applying Clear Shrink Film for Extra Insulation
If you have old, single-pane windows, cold air can easily pass right through the thin glass, even if your frames are perfectly sealed.
To solve this, you can use a cheap window insulation shrink film kit to create an extra thermal barrier.
This thin, clear plastic film acts like a second pane of glass, trapping a layer of air between the cold window and your warm room.
Installing the Shrink Film
First, clean the window molding around the frame and apply the double-sided tape included in your kit.
Measure the window frame and cut the plastic film so it is slightly larger than the taped area.
Press the plastic sheet firmly onto the double-sided tape, making sure to pull it as flat as possible.
Use a standard household hair dryer on its high-heat setting, holding it a few inches away from the plastic.
Slowly move the warm air in circular motions across the film, watching the plastic tighten and smooth out.
The wrinkles will disappear, leaving you with a clean, clear window surface that stops heavy drafts cold.
Step 5: Utilizing Draft Stoppers and Heavy Thermal Curtains
For windows with very large gaps at the bottom, or for old wooden frames that are difficult to seal with tape, you can use physical fabric barriers.
These options are highly versatile, inexpensive, and can be removed easily whenever the weather warms up.
The Magic of Draft Stoppers
A draft stopper is a long, fabric tube stuffed with heavy material like dried beans, rice, or dense foam.
Place this heavy tube directly along the bottom sill where your window sash meets the frame.
It acts like a small sandbag, physically blocking any cold air from entering the room through the bottom crack.
Hanging Thermal Insulated Curtains
Thermal curtains are made of thick, heavy fabrics like velvet or polyester lined with special insulating backing materials.
Hang these curtains so they cover your entire window frame, extending a few inches past the sides and bottom.
Keep the curtains closed during cold nights to block chilly drafts from spreading into your room.
During sunny winter days, open the curtains to let the natural heat of the sun warm your home for free.
Critical Mistakes That Can Ruin Your Window Frames
When trying to stop cold window drafts, it is easy to make mistakes if you rush or use the wrong materials.
Some quick-fix methods can damage your home, trap moisture, or even create safety hazards.
Avoid these five common pitfalls to ensure your window repairs are safe, effective, and long-lasting.
1. Sealing Your Emergency Exit Windows Completely Shut
One of the most dangerous mistakes is sealing every single window in your home so tightly that they cannot be opened in an emergency.
Your bedrooms and main living spaces must always have at least one window that can be opened quickly in case of a fire.
Never use permanent caulking, nails, or heavy screws to lock a window frame shut.
Always use temporary materials like adhesive foam tape or draft stoppers on exit windows, as these can be removed instantly if you need to escape.
2. Applying Caulk to the Wrong Areas of the Window Frame
Caulking is an excellent way to seal stationary gaps, but it should never be applied to the moving parts of a window.
If you put caulk along the tracks where your window sash slides up and down, you will glue your window permanently shut.
Only apply exterior silicone caulk to the stationary seams where the window trim meets your exterior siding or interior drywall [10].
For the moving tracks and sashes, always stick to flexible, compressible weatherstripping materials.
3. Ignoring Old, Rotting Wood Before Sealing the Frame
If you have old wooden windows, moisture can sometimes get trapped inside the wood, causing it to rot.
Applying weatherstripping or shrink film over soft, rotting wood will trap the moisture inside and speed up the decay process.
Always inspect your wooden frames carefully and use a screwdriver to press into any dark, soft spots.
If the wood is rotten, you must repair or replace the damaged wood before attempting to seal the window.
4. Relying Exclusively on Cheap Plastic Wrap from the Kitchen
Some homeowners try to save money by using regular kitchen plastic wrap instead of a proper window shrink film kit.
Kitchen plastic wrap is too thin, does not shrink evenly with heat, and will quickly sag, tear, or pull away from the tape.
Always purchase a proper window insulation kit, which uses heavy-duty plastic designed to shrink tight and stay clear under heat.
5. Over-Tightening Your Window Locks and Latches
If your window dollar bill test fails, you might feel tempted to force the window lock shut using tools to pull the frame closer together.
Forcing a window lock can easily bend the metal latches, strip the screws out of the vinyl frame, or even crack the glass pane.
If a window will not lock easily, check the bottom track for dirt, gravel, or ice that might be blocking the frame from closing fully.
Taking Control of Your Home Comfort and Energy Savings
Sealing your drafty windows is one of the most rewarding home improvement projects you can complete on your own.
It does not require professional training, expensive tools, or a massive budget to make a noticeable difference.
By taking the time to find the drafts, clean your frames, and apply the correct materials, you can transform your home into a cozy haven.
You will instantly feel the difference in room temperature, and your heating system will run much more efficiently.
Gather your supplies, do the smoke test this weekend, and start enjoying a warmer, more comfortable home today while keeping your utility bills under control.