
The Morning My Ceiling Caved In (And the Costly Blunders I Made Next)
At 3:00 AM on a freezing Tuesday, a hidden pipe burst above my hallway and sent drywall crashing down on my favorite bookcase. Panicked and half-asleep, I did everything wrong: I tossed soaked family photo albums into trash bags, blurted out the wrong words to my insurer, and trusted that my policy would magically cover every cent. Instead, I spent the next four months fighting partial denials and paying surprise out-of-pocket bills that drained my savings. Property damage pushes your brain into pure panic mode, but insurance companies treat your loss strictly as numbers on a contract. Here is what I learned the hard way—and the exact steps you need to take so you do not leave thousands of dollars on the table.
⚡ Quick Takeaways: Avoid These Costly Claim Traps
- Stop Leaks, Don't Rebuild: Dry out the area immediately, but never hang new drywall or throw away ruined items before the adjuster's inspection.
- Watch Your Words: Stick to plain facts. Avoid guessing how long a leak lasted, and never use the word "flood" for an indoor pipe break.
- Initial Checks Are Baselines: The first check is based on depreciated value (ACV). Your contractor can submit itemized supplements for more.
- Track Every Penny: Keep receipts for hotel stays, meals, and laundry to get full reimbursement under your Loss of Use / ALE coverage.

The Hidden Realities of How Insurance Companies Review Your Claim
When your house takes a hit, you see broken memories and a ruined living space. Your insurance carrier, however, sees line items, policy limits, and standard pricing tables. Their desk adjusters use pricing tools like Xactimate that apply heavy depreciation to your flooring, paint, and furniture based on average regional numbers. If you do not know how their system works, you can easily end up with a payout check that does not even cover half your real contractor bills.
To get the full payout you are legally entitled to receive, you must approach your claim with clear documentation and a structured strategy.
Let us explore the most damaging mistakes policyholders make after property damage, along with practical steps to avoid them.
1. Waiting Too Long to Report the Loss to Your Carrier
One of the most frequent errors homeowners make is delaying their initial phone call or app submission to the insurance company.
Some people wait because they want to clean up the mess first, while others spend days trying to collect contractor estimates before opening a claim file.
Almost every homeowners insurance policy contains a standard clause requiring prompt notice of loss from the policyholder.
When you delay reporting, water damage can rapidly spread, wood can warp, and toxic mold spores can begin colonizing drywall within 24 to 48 hours.
If the insurance carrier notices that secondary damage developed because you waited several days to notify them, they can legally deny that portion of your claim under the failure to mitigate rule.
They may argue that a small plumbing leak only caused fifty dollars worth of subfloor damage originally, but your delay caused three thousand dollars in rot.
- Report the incident immediately: Call your carrier's 24/7 claims hotline as soon as the immediate danger has passed.
- Get your claim number: Write down the official claim number, the date and exact time of your call, and the name of the representative.
- Establish the date of loss accurately: State the exact date the damage occurred so there is no confusion regarding your policy term coverage.
2. Throwing Away Damaged Belongings Before the Adjuster Inspects Them
It feels completely natural to haul ruined carpets, broken electronics, and soaked furniture out to the curb right away to keep your home clean.
However, tossing your personal property in the dumpster before the field adjuster has inspected it is a direct path to an underpaid or disputed claim.
Physical evidence is the gold standard of proof in the property adjustment industry.
When you throw an expensive item away, you leave the adjuster with no tangible way to verify its brand, model number, original quality, or actual existence.
Even if you have an old receipt, adjusters want to see the physical item to confirm that the reported damage matches the event that caused the loss.
If you are dealing with contaminated items—like sewage backup or soaked organic fabrics—you must document them thoroughly before safe disposal.
- Create a temporary staging area: Move ruined items to an out-of-the-way space like your garage, patio, or driveway tarp.
- Capture serial numbers and tags: Snap clear close-up photos of manufacturer labels, model numbers, and care tags.
- Seek written permission: Ask your adjuster in writing (via email or text) for explicit permission before discarding large ruined materials.
3. Skimping on Photo and Video Evidence
When you file an insurance claim, your smartphone is the most valuable tool you own.
Many homeowners take three or four quick, blurry photos of a flooded room and assume that is enough proof for an adjuster to write an accurate estimate.
In reality, adjusters look at dozens of claims per week, and they rely heavily on crystal-clear visual evidence to approve specific repair line items in their software.
📺 Helpful Video Guide Before Your Inspection:
If you want to see exactly how insurance adjusters evaluate property damage on-site and learn how to present your evidence like a pro, watch this comprehensive walkthrough:

If your photos do not show the exact height of the water line on the baseboards, the adjuster might only approve repainting instead of drywall replacement.
If you fail to capture the underside of a cabinet where water collected, you might miss out on thousands of dollars needed for custom carpentry work.
- Shoot high-resolution video walks: Record a slow, continuous video of the entire affected area while narrating what you see out loud.
- Use measuring tapes for scale: Place a ruler or tape measure next to cracks, standing water, or structural displacement in your photos.
- Capture surrounding dry areas: Take pictures of undamaged adjacent rooms to establish the baseline condition and finish level of your home before the loss.
4. Misunderstanding the Difference Between RCV and ACV
Many homeowners glance at their policy summary, see a high coverage limit like $400,000, and assume the insurance company will simply write a check for brand-new replacement costs.
They are shocked when their first settlement payment arrives and it is dramatically lower than the contractor bids they collected.
This happens because of the difference between Replacement Cost Value (RCV) and Actual Cash Value (ACV).
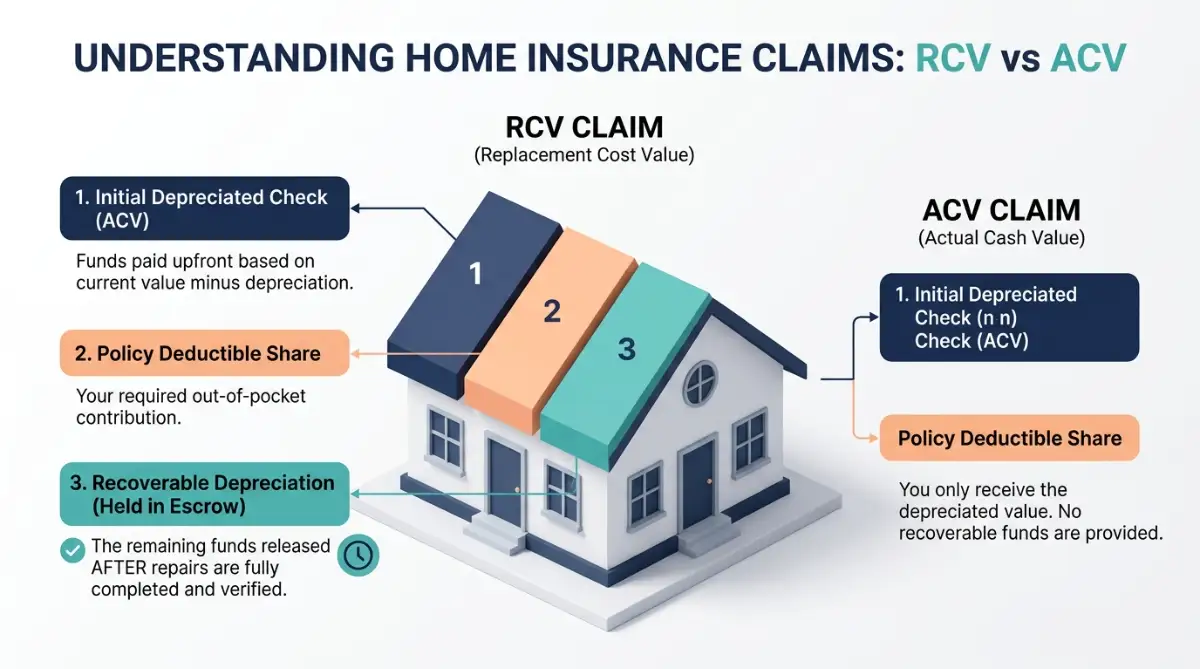
Most modern policies pay out on an ACV basis initially, holding back what the industry calls recoverable depreciation until you prove the work is finished.
If your policy is written strictly on an ACV basis (which is common on older roofs), that depreciation money is lost forever, and you must cover the gap yourself.
- Check your policy declarations page: Look specifically for the words "Replacement Cost" versus "Actual Cash Value" for both your dwelling (Coverage A) and personal property (Coverage C).
- Understand recoverable depreciation rules: Ask your adjuster how many months you have to complete repairs and submit receipts to claim your held-back funds.
- Never treat the first check as the final total: The initial check is almost always just the depreciated ACV payment minus your deductible.
To avoid costly misunderstandings before disaster strikes, learning the smart way to read insurance policy reviews and avoid bad advice will help you spot these hidden ACV clauses and coverage limits ahead of time.
5. Failing to Prevent Further Damage (Neglecting Mitigation)
Your policy clearly states that you must take quick, reasonable steps to stop damage from spreading after an accident. In plain English, this is called "mitigation." If high winds rip shingles off your roof, your insurer expects you to throw a sturdy tarp over the exposed wood as soon as the storm passes. If you skip this step and let rain soak through the ceilings for three straight days, the company can legally refuse to pay for the ruined floors below.
If you leave that roof hole open for three rainy days without a tarp, the insurance company will likely pay for the missing shingles, but they will deny the ruined hardwood floors underneath.
The same rule applies to water leaks; you must shut off the main water valve and set up fans or hire a certified drying company quickly.
- Board up and tarp immediately: Cover broken windows, exposed roof decking, and cracked exterior siding right away.
- Keep all mitigation receipts: Save every invoice for tarps, dehumidifiers, fans, plywood, and specialized drying services, because these costs are reimbursable under your policy.
- Avoid permanent repairs before inspection: Only perform temporary emergency stabilization; do not rebuild walls or install new flooring until the adjuster finishes their initial inspection.
6. Using Ambiguous or Harmful Language When Describing the Loss
The exact words you choose when reporting your loss to the insurance representative or adjuster carry immense weight.
Insurance policies cover sudden and accidental physical damage, but they strictly exclude damage caused by normal wear and tear, neglect, or long-term gradual seepage.
When you call in your claim, using casual phrases like "this pipe has been leaking for a while" can trigger an automatic red flag in the claims intake system.
Even if you meant that you noticed water yesterday and think it started recently, the word "months" suggests gradual deterioration that is excluded from your coverage.
Stick strictly to observable facts rather than guessing what happened behind the walls.
- Avoid speculating on causes: If you do not know why a pipe broke or why a roof failed, say "I do not know the technical cause yet, but I discovered the water at 8:00 AM."
- Never use the word "flood" for plumbing leaks: In insurance terms, a "flood" refers strictly to rising surface water from outside (which requires separate flood insurance), not an indoor plumbing burst.
- Keep statements simple and factual: Describe what you see with your eyes rather than offering amateur mechanical or engineering theories.
7. Starting Major Permanent Repairs Before the Adjuster Reviews the Scope
In a rush to put their homes back together, many property owners hire contractors to rebuild walls, tile floors, and paint rooms before the insurance company's field adjuster ever steps foot on the property.
While taking fast action to stabilize your home is smart, jumping straight into permanent reconstruction is a critical error.
Once new drywall is hung and painted, the adjuster cannot verify the extent of the framing damage, wet insulation, or hidden electrical wiring issues that were inside the wall cavity.
If the adjuster cannot see the damage, they cannot justify including those repair line items in their official estimate.
This leaves you stuck paying your contractor out of pocket for any work that was completed without prior insurance company verification.
- Separate emergency work from rebuilding: Only permit drying, water extraction, board-up, and tarping before the formal inspection occurs.
- Request an expedited inspection: If your home is uninhabitable, tell the claims manager immediately so they can assign an emergency adjuster within 24 to 48 hours.
- Get written scope approval: Ensure your contractor and the insurance company adjuster agree on the necessary repairs before signing a structural reconstruction contract.
8. Accepting the Initial Settlement Offer as Final and Unchangeable
When an insurance company sends out its first settlement check, many policyholders assume that the number on the check is final and that nothing more can be done.
In reality, the initial estimate provided by a carrier is simply a baseline starting point based on general regional pricing averages and visual observations.
Field adjusters often miss subtle hidden damage, and the standardized software they use (such as Xactimate) may underestimate the current local market cost for skilled trade labor and materials.
If your contractor discovers that local labor rates are higher, or if they find rotten framing studs after opening a wall, you have the right to file what is known as a claim supplement.
A supplement is an official request for additional insurance funds to cover necessary repair items that were omitted or underestimated on the original adjuster report.
- Do not sign a full liability release: Make sure any initial check you cash does not contain language releasing the insurer from future claims related to this event.
- Have your licensed contractor review the estimate: Ask your builder to cross-reference the adjuster's line items line by line against real-world material and labor costs.
- Submit itemized supplement requests with photos: Provide clear photographic evidence of any newly uncovered damage alongside your contractor's detailed line-item invoice.
Real-World Case: How an Itemized Supplement Closed a $6,300 Payout Gap
Here is a real breakdown of what happened when my licensed general contractor reviewed the initial desk adjuster estimate after our bathroom supply line burst:
Takeaway: Photos of open wall framing and itemized local labor costs forced the desk adjuster to approve every single missing item without going to court.
9. Forgetting to Claim Additional Living Expenses (ALE / Loss of Use)
If your home suffers significant damage from a major event, living inside the house during the messy tear-out and rebuilding process might be unsafe or impossible.
Most homeowners focus entirely on getting money to fix their physical structure and forget all about their Coverage D: Loss of Use / Additional Living Expenses (ALE).
ALE coverage is designed to maintain your family's normal standard of living when you are displaced from your home due to a covered loss.
It covers the financial difference between what you normally spend on housing and food versus what you are forced to spend while living in temporary accommodations.
If your normal monthly grocery bill is $600, but living in a hotel without a full kitchen forces you to spend $1,400 eating at restaurants, your policy can reimburse you for that extra $800 difference.
- Keep every receipt: Save itemized receipts for hotel rooms, temporary apartment leases, laundry services, pet boarding, storage units, and restaurant meals.
- Track extra mileage: Log additional driving miles if your temporary rental home is located further from your workplace or your children's school than your damaged house.
- Know your coverage cap: Check your policy declarations page to find the total dollar ceiling and time limit (often 12 to 24 months) on your specific ALE benefits.
Pro Tip: My Costly Inventory Oversight and How You Can Avoid It
I learned this lesson the hard way when my own ceiling collapsed on my living room furniture.
When the claims adjuster asked me for an itemized list of ruined personal belongings, I casually wrote down generic terms like "two floor lamps, one leather office chair, and an assortment of hardcover books."
Because I did not specify the exact brand names or models, the insurance system defaulted to paying me for the cheapest generic options available on the market.
I lost over eight hundred dollars on my personal property settlement simply because I was too tired and hurried to look up my old online purchase history and receipt emails.
- Log exact details: Always write down the brand name, exact model number, size, color, and original purchase location for every damaged possession.
- Search your email inbox for digital receipts: Use keywords like "order confirmation" or specific brand names to retrieve original purchase prices and purchase dates.
- Take annual video home inventories: Before disasters strike, walk through your home once a year while opening every closet and drawer, filming serial numbers for safe cloud storage.
Practical Checklist: What to Do in the First 48 Hours
To ensure you stay organized and protect your claim payout from day one, follow this chronological action guide when an unexpected property loss occurs:
Ensure personal safety first: Turn off the main electrical breaker and water shutoff valve if standing water or structural shifting is present.
Document before moving anything: Walk the property with your phone camera running on high-definition video before moving a single item.
Execute emergency mitigation: Set up tarps on open roofs, board up broken windows, and arrange water extraction to prevent secondary mold.
Call your insurance company: File your loss report, obtain your official claim number, and ask for the direct contact details of your assigned field adjuster.
Set up a dedicated claim binder: Keep a dedicated physical folder or digital notebook to log every phone call, adjuster name, date, time, and conversation summary.
Preserve your evidence: Move damaged personal items to a sheltered holding area (like a garage) rather than tossing them into the trash bin.
Track out-of-pocket expenses: Place all receipts for emergency repair supplies, drying fans, and hotel stays into your claim tracking folder.
Avoiding these common errors gives you full control over your claim process and ensures your insurance carrier delivers every dollar you need to restore your home.
Advanced Claim Strategies That Level the Playing Field
When you enter a complex property loss negotiation, having basic documentation is only your first layer of defense.
To secure a fair settlement that covers true rebuilding costs, you need to understand how the insurance industry operates behind closed doors.
Adjusters use standardized estimating programs that calculate labor, haul-away fees, and materials using regional formulas that often lag behind real-world market spikes.
Understanding how to read these estimates line by line gives you immense leverage during settlement conversations.
1. Demand an Itemized Estimate Breakdown in Xactimate Format
Most insurance carriers build their repair estimates using specialized estimating software known as Xactimate or Symbility.
These platforms break down repairs into distinct categories such as tear-out, dump fees, drywall hang, tape, texture, seal, and two coats of paint.
When insurance companies send you a settlement summary, they often deliver a condensed one-page document showing only broad totals.
Always request the full, multi-page itemized printout showing every individual unit price and measurement.
Reviewing the exact breakdown reveals whether they budgeted for baseboards, wall priming, or proper hazardous material containment.
If you spot omitted line items, your contractor can write a detailed counter-estimate matching that exact unit-cost format, making approval much faster.
2. Know When to Hire a Licensed Public Adjuster
Company adjusters and independent adjusters represent the financial interests of the insurance company that hires them.
A Public Adjuster (PA), by contrast, is a state-licensed claims professional who works exclusively for you, the homeowner.
If you are dealing with a complex claim exceeding $50,000, hiring an accredited professional can make a massive difference. You can verify credentials, licensing status, and consumer reviews through the National Association of Public Insurance Adjusters (NAPIA) directory before making your hiring decision.
Public adjusters perform their own comprehensive measurements, write independent damage estimates, and handle carrier negotiations directly.
They typically charge a small percentage (usually 10% to 15%) of the total claim settlement for their services.
If your claim is small, paying a fee might not make sense, but on large, complex structural losses over $50,000, their expertise often uncovers thousands in missed damages.
3. Leverage Independent Moisture and Structural Experts
Hidden structural issues, trapped subfloor water, and compromised load-bearing posts can go completely unnoticed during a standard visual walk-through.
Insurance adjusters usually spend less than an hour on-site, which is rarely enough time to find water trapped beneath tiled floors or behind insulated walls.
Hiring an independent IICRC-certified moisture technician or a licensed structural engineer gives you indisputable technical proof.
These specialists use thermal imaging cameras, pinless moisture meters, and hygrometers to map moisture paths scientifically.
Their written technical reports serve as authoritative evidence that forces claims desk handlers to approve comprehensive drying and structural repair items.
4. Create an Unbroken Paper Trail of All Communications
Verbal agreements made over the phone with insurance representatives often vanish when your claim moves to a new desk handler.
Claims departments experience high employee turnover, meaning your file could easily be passed between three or four different adjusters before completion.
Every time you finish a phone conversation with an adjuster, immediately send a polite follow-up email summarizing everything discussed.
Use a simple template: "Thank you for your time today. As discussed, you agreed to review the additional roof shingle photos and issue an updated estimate by Friday."
This simple habit creates a permanent, time-stamped written record that prevents adjusters from changing their verbal promises later.
If an insurer causes unfair delays, your clean written timeline serves as strong documentation if you ever need to file a complaint with your state regulator.
5. Master the Appraisal Clause to Break Settlement Deadlocks
When you and your insurance company reach an absolute standstill over the dollar value of your loss, you do not have to head straight to court.
Nearly all standard homeowners insurance policies contain an Appraisal Clause specifically designed to settle pricing disputes out of court.
Under this clause, you hire an independent appraiser, the insurance company hires their own appraiser, and both sides select a neutral third-party umpire.
An agreement reached by any two of these three individuals sets the final, legally binding repair amount for the loss.
This process prevents the insurer from simply saying "no" and leaving you stranded with an incomplete repair budget.

Critical Trapdoors That Cause Claim Denials and Financial Loss
Filing a property claim without preparation exposes you to legal loopholes and policy exclusions that can cost you thousands of dollars.
Avoiding these traps keeps your file moving forward smoothly and prevents surprise out-of-pocket bills.
Trap 1: Signing an Unrestricted Assignment of Benefits (AOB)
Right after a bad storm or a flooded basement, high-pressure contractors often show up at your door with clipboards asking you to sign an Assignment of Benefits (AOB) form. Signing this gives away your policy rights and hands total claim control over to the builder. That contractor can then bill your insurer inflated rates without asking you. When the insurer pushes back and refuses to pay the crazy bill, that same contractor can put a lien on your house to get their money from you.
- Never sign a full AOB agreement: Always retain direct ownership of your insurance policy rights and payouts.
- Sign a "Direct Pay Authorization" instead: Allow the carrier to pay the contractor only for verified, approved scopes of work.
- Read the fine print: Ensure your agreement clearly states that you must personally approve all repair estimates before work begins.
Trap 2: Filing Small Claims Below or Near Your Deductible
Filing an insurance claim for an $1,800 repair when your deductible is $1,500 is one of the worst financial decisions a homeowner can make.
In this scenario, the insurer only pays you $300, but an official property loss record is permanently added to your claims history.
Carriers share a central industry database called the Comprehensive Loss Underwriting Exchange (C.L.U.E.), which tracks every claim reported on your property for up to seven years.
Multiple small claims—even if the company paid out zero dollars—can cause your annual premium to surge or cause your policy to be canceled entirely.
To check your specific state laws regarding claim handling timelines, consumer protections, and rate regulations, review the educational tools provided by the National Association of Insurance Commissioners (NAIC) consumer portal.
When shopping for reliable property coverage that will not hike rates aggressively over minor claims, knowing how to evaluate carriers before you trust that insurance review, read this first ensures your home is backed by a trustworthy insurer.
Trap 3: Hiring "Storm Chaser" Contractors Without Local Roots
After severe hailstorms, hurricanes, or tornadoes, out-of-town contractors flood damaged neighborhoods offering "free roofs" and promising to handle everything with your insurer.
Many of these door-to-door crews lack local trade licenses, carry no general liability insurance, and leave town as soon as they cash your initial insurance check.
When problems arise with roof leaks months later, their phone numbers are disconnected, and your manufacturer warranties are completely void because of improper installation.
Always choose an established, locally owned contractor with a permanent physical office, verified local references, and a clear standing with the Better Business Bureau.
Trap 4: Overlooking Code Upgrade Requirements (Ordinance or Law Coverage)
Building codes change regularly to improve home safety, energy efficiency, and structural wind resistance.
When repairing an older home, local city inspectors often require you to upgrade undamaged plumbing, electrical panels, or roof decking to meet current codes.
Standard dwelling coverage pays only to replace what was physically damaged using original construction methods.
If you do not have Building Ordinance or Law Coverage attached to your policy, you will have to pay for those mandatory code upgrades out of your own pocket.
Budget-friendly carriers often strip out specialized endorsements like Ordinance or Law to advertise low monthly premiums. Exploring cheap insurance reviews: what they don't tell you reveals how these bare-bones policies leave homeowners stuck with massive out-of-pocket bills during a rebuild.
Always ask your contractor if the planned repairs trigger mandatory local building code upgrades, and notify your adjuster right away to activate this specific coverage.
Trap 5: Giving Recorded Statements Without Reviewing Your Facts
Shortly after you file a claim, a friendly desk adjuster will call and ask if they can record the phone call to "get your official statement on the record."
You are obligated to cooperate with your insurance company, but you are not legally required to give an unprepared, unedited recorded statement on the spot.
Adjusters are trained to ask open-ended questions designed to see if pre-existing wear, maintenance neglect, or excluded perils contributed to the loss.
Politely tell the adjuster that you want to review your notes, timeline, and repair receipts first, and schedule a specific time for the recorded phone call later.
The Homeowner's Smart Claim Playbook (Do's vs. Don'ts)
Property Insurance Myths That Drain Your Wallet
- Myth 1: "I should clean up all the debris and throw away ruined furniture before the adjuster comes over."
- Fact: If you throw it away, you lose your proof. Move wet belongings to your garage or backyard patio under a tarp, take clear photos of every model sticker, and keep them until your adjuster gives written permission to toss them.
- Myth 2: "If I cash the first check from my insurer, my claim is officially closed forever."
- Fact: The opening check is simply an advance on undisputed costs. As long as you do not sign a full liability release waiver, you and your contractor can file supplemental requests for hidden damage anytime during repairs.
- Myth 3: "My policy only pays for physical repairs on the house, not my hotel stays or extra takeout meals."
- Fact: Your Loss of Use (Coverage D) pays the difference between your normal living expenses and the extra costs of living away from home while repairs are underway.
Frequently Asked Questions About Property Insurance Claims
1. What should I do if the insurance adjuster's estimate is too low?
Never accept the first estimate as final. Have your licensed contractor create an itemized estimate using industry standard unit pricing. Your builder can submit this directly to the claims adjuster along with detailed photos of missing labor steps and hidden damage to request a formal supplement.
2. How long do I have to recover depreciation on my claim?
Most standard replacement cost policies give you 180 to 365 days from the date of loss to complete all repairs and submit final paid contractor invoices. Always check your policy declarations page to confirm your specific depreciation recovery deadline so you do not lose those held-back funds.
3. Can my insurer deny my claim if I clean up water damage myself?
No, your insurer cannot deny your claim for cleaning up water, but they can deny you if you discard ruined building materials or personal items before inspection. You are required to extract water and dry the area to stop mold, but keep all damaged items in a safe spot for verification.
4. Is it worth hiring a public adjuster for a small leak?
Public adjusters generally take 10% to 15% of your total settlement check. For small claims under $10,000, paying that fee usually does not make sense. However, for major losses over $50,000 involving complex structural damage, their knowledge often uncovers thousands in missed repairs.
5. Will filing a small property claim raise my insurance rates?
Yes, filing claims for minor repairs near your deductible can hurt your rates. Insurance companies record every claim in the industry C.L.U.E. database for up to seven years. If a repair costs within $1,000 of your deductible, paying out of pocket helps keep your claims record clean.
Action Plan: Moving Forward with Confidence and Clarity
Managing a major property loss can feel overwhelming, but staying organized puts you in complete control of your financial recovery.
Treat your insurance claim just like a professional business project: stay calm, stick to documented facts, and keep detailed records of every interaction.
When you understand your policy terms, maintain an unbroken paper trail, and stand your ground on repair scopes, you eliminate the delays and underpayments that hurt unprepared homeowners.
You bought insurance to protect your family's biggest investment, and with the right strategy, you will get every dollar needed to restore your home safely.
I know how exhausting it feels to stare at a damaged ceiling while balancing repair estimates and adjuster calls, but staying patient and organized completely changes the outcome.
Take a deep breath, follow these practical steps one by one, and protect your hard-earned investment with confidence.
Disclaimer:
The informational guidelines provided in this article are intended strictly for educational, informational, and consumer awareness purposes. Property insurance policies, state statutes, building codes, and claims handling regulations vary significantly by jurisdiction, state, and individual insurance carrier contract terms. This article does not constitute formal legal advice, structural engineering counsel, or professional public adjusting services. If you are experiencing a complicated or disputed property damage claim, consult with a licensed public adjuster, a certified insurance attorney, or your state insurance regulatory department to receive advice tailored to your specific situation.